To Create, Read, Update, Delete Operation in C# using MYSQL. In this C# Windows Application, Let’s create simple windows application to perform the CRUD operations.
What CRUD Operations is?
CRUD Meaning: CRUD is a combination of four functions that are create, read, update and delete that are necessary to maintain a any storage application, basically it shows the basic four main function that could be perform on any database that is connected with our application.
CRUD Databases and their related Applications to Manage them
The CRUD applications are those who contains the basic CRUD functions that are present in different RDBMS systems like Microsoft SQL Server, MySQL, Oracle database and others. The four functions that are used by users to perform different types of operations on selected data in the database. This could be done only using code or through a GUI (graphical user interface).
CRUD operations in C# Windows Application
Let’s creat a C# window Application and Database then we will see how to connect them together and perform the CRUD operations on it.
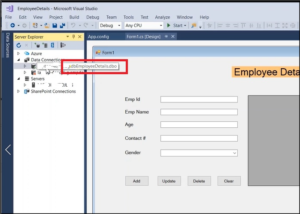
Creating C# Window form and Database with Table
In below example, we will see how to create a windows application and add controls to the form and create a database and tables.
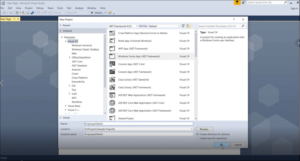
Step 1:
Open Visual Studio >then click on File menu >click on New >then Click on Project.

Step 2:
New Project dialog will show, Select Visual C# templates > then Choose .Net Framwork > Select “Windows Forms App (.Net Framework)”.
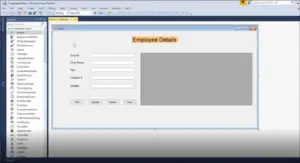
Step 3:
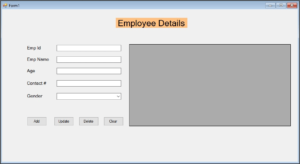
Once the application is created, We will start adding controls from the Toolbox section and then provide proper names for controls.
Step 4:
Now, We will create a database and table in SQL Server. Open the “Microsoft SQL Server Management Studio” > then Right Click on “Database” folder >then Click on“New Database”.
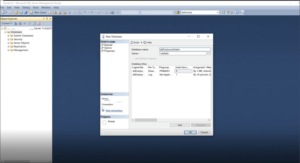
Below “New Database” dialog will show, provide a new database name as “dbEmployeeDetails” and click OK.
Step 5:
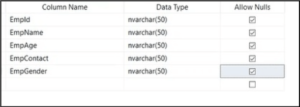
Then run new table creation query that is given below in SQL window to create a new Emp_details table.
CREATE TABLE [dbo].[Emp_details]
(
[EmpId] [int] NOT NULL,
[EmpName] [nvarchar](50) NULL,
[EmpAge] [int] NULL,
[EmpContact] [int] NULL,
[EmpGender] [nchar](10) NULL
)
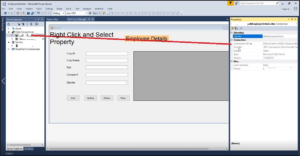
Now we can also verify table columns by Right-Click the newly created table and click “Design”. The table looks like below in SQL studio, now we have successfully created a database.
Connecting Database with C# Window Application
We will see now how to create a database connection between windows application and database, how to retrieve, insert, update, and delete data from the database (CRUD Operation).
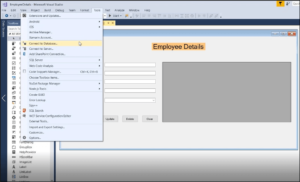
Step 1:
We can add database connection easily in windows application just follow the simple steps,
Go to Tools menu then> Click “Connect to Database”.
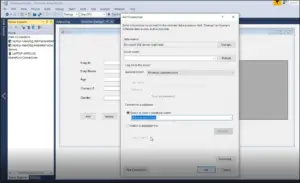
Step 2:
By default, the Microsoft SQL Server (SQL Client) is selected as the data source.
Then provide “Server name” to localhost and Select our database in the drop-down as “dbEmployeeDetails”.
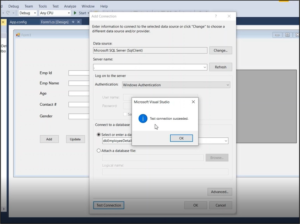
Step 3:
We need to verify the database connection by clicking the “Test Connection” button, Once the connection is verified you will see the “Test connection succeeded” message box.
Step 4:
When the database connection is created, then you will see the connection details.
Step 5:
How can we know the connection string?
Right Click select database connection > Properties > Copy “Connection string” for reference,
Step 6:
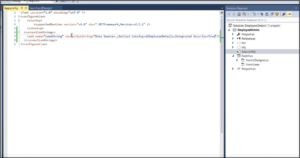
As a first step, We need to add a connection string in “App.config” file to connect the database,
Step 7: Insert Employee Details
Firstly, we will have to create an Employee class and its properties,
public class
{
public string EmpId { get; set; }
public string EmpName { get; set; }
public string Age { get; set; }
public string ContactNo { get; set; }
}
Now Add the read connection string from App.config using Configuration manager,
private static string myConn = ConfigurationManager.ConnectionStrings["connString"].ConnectionString;
The method accepts employee details and then it opens SQL connection and run the command to insert the employee details in the database using INSERT query ,if it success, then returns true or else false.
private const string InsertQuery = "Insert Into Emp_details(EmpId, EmpName, EmpAge, EmpContact, EmpGender) Values (@EmpId, @EmpName, @EmpAge, @EmpContact, @EmpGender)";
public bool InsertEmployee(Employee employee)
{
int rows;
using (SqlConnection con = new SqlConnection(myConn))
{
con.Open();
using (SqlCommand com = new SqlCommand(InsertQuery, con))
{
com.Parameters.AddWithValue("@EmpId", employee.EmpId);
com.Parameters.AddWithValue("@EmpName", employee.EmpName);
com.Parameters.AddWithValue("@EmpAge", employee.Age);
com.Parameters.AddWithValue("@EmpContact", employee.ContactNo);
com.Parameters.AddWithValue("@EmpGender", employee.Gender);
rows = com.ExecuteNonQuery();
}
 }
return (rows > 0) ? true: false;
}
Step 8: Update Employee
The UpdateEmployee method accepts updated employee details and opens SQL connection and updates the employee details into the database using UPDATE query, if success, then returns true or else false.
private const string UpdateQuery = "Update Emp_details set EmpName=@EmpName, EmpAge=@EmpAge, EmpContact=@EmpContact, EmpGender=@EmpGender where EmpId=@EmpId";
public bool UpdateEmployee(Employee employee)
{
int rows;
using (SqlConnection con = new SqlConnection(myConn))
{
con.Open();
using (SqlCommand com = new SqlCommand(UpdateQuery, con))
{
com.Parameters.AddWithValue("@EmpName", employee.EmpName);
com.Parameters.AddWithValue("@EmpAge", employee.Age); com.Parameters.AddWithValue("@EmpContact", employee.ContactNo);
com.Parameters.AddWithValue("@EmpGender", employee.Gender); com.Parameters.AddWithValue("@EmpId", employee.EmpId);
rows = com.ExecuteNonQuery();
}
 }
return (rows > 0) ? true : false;
}
Step 9: Delete Employee
The DeleteEmplyee method pass the selected employee id to delete the employee details in the database using the DELETE query. if it success, then returns true or else it returns false.
private const string DeleteQuery = "Delete from Emp_details where EmpId=@EmpId";
public bool DeleteEmployee(Employee employee)
{
int rows;
using (SqlConnection con = new SqlConnection(myConn))
{
con.Open();
using (SqlCommand com = new SqlCommand(DeleteQuery, con))
{
com.Parameters.AddWithValue("@EmpId", employee.EmpId);
rows = com.ExecuteNonQuery();
}
 }
return (rows > 0) ? true : false;
}
Step 10: Retrieve Employee Details
The method GetEmplyees returns all the employees which are stored in the database using the SELECT query as shown below,
private const string SelectQuery = "Select * from Emp_details";
public DataTable GetEmployees()
{
var datatable = new DataTable();
using (SqlConnection con = new SqlConnection(myConn))
{
con.Open();
using(SqlCommand com = new SqlCommand(SelectQuery, con))
{
using(SqlDataAdapter adapter = new SqlDataAdapter(com))
{
adapter.Fill(datatable);
}
 }
  }
 return datatable;
}
The Employee class now look likes below,
using System;
using System.Collections.Generic;
using System.Configuration;
using System.Data;
using System.Data.SqlClient;
using System.Linq;
using System.Text;
using System.Threading.Tasks;
namespace EmployeeDetails
{
class Employee{
private static string myConn = ConfigurationManager.ConnectionStrings["connString"].ConnectionString;
public string EmpId { get; set; }
public string EmpName { get; set; }
public string Age { get; set; }
public string ContactNo { get; set; }
public string Gender { get; set; }
private const string SelectQuery = "Select * from Emp_details";
private const string InsertQuery = "Insert Into Emp_details(EmpId, EmpName, EmpAge, EmpContact, EmpGender) Values (@EmpId, @EmpName, @EmpAge, @EmpContact, @EmpGender)";
private const string UpdateQuery = "Update Emp_details set EmpName=@EmpName, EmpAge=@EmpAge, EmpContact=@EmpContact, EmpGender=@EmpGender where EmpId=@EmpId";
private const string DeleteQuery = "Delete from Emp_details where EmpId=@EmpId";
public DataTable GetEmployees()
{
var datatable = new DataTable();
using (SqlConnection con = new SqlConnection(myConn))
{
con.Open();
using(SqlCommand com = new SqlCommand(SelectQuery, con))
{
using(SqlDataAdapter adapter = new SqlDataAdapter(com))
{
adapter.Fill(datatable);
}
 }
  }
return datatable;
}
public bool InsertEmployee(Employee employee)
{
int rows;
using (SqlConnection con = new SqlConnection(myConn))
{
con.Open();
using (SqlCommand com = new SqlCommand(InsertQuery, con))
{
com.Parameters.AddWithValue("@EmpId", employee.EmpId);
com.Parameters.AddWithValue("@EmpName", employee.EmpName);
com.Parameters.AddWithValue("@EmpAge", employee.Age);
com.Parameters.AddWithValue("@EmpContact", employee.ContactNo);
com.Parameters.AddWithValue("@EmpGender", employee.Gender);
rows = com.ExecuteNonQuery();
}
 }
return (rows > 0) ? true: false;
}
public bool UpdateEmployee(Employee employee)
{
int rows;
using (SqlConnection con = new SqlConnection(myConn))
{
con.Open();
using (SqlCommand com = new SqlCommand(UpdateQuery, con))
{
com.Parameters.AddWithValue("@EmpName", employee.EmpName);
com.Parameters.AddWithValue("@EmpAge", employee.Age);
com.Parameters.AddWithValue("@EmpContact", employee.ContactNo);
com.Parameters.AddWithValue("@EmpGender", employee.Gender);
com.Parameters.AddWithValue("@EmpId", employee.EmpId);
rows = com.ExecuteNonQuery();
}
 }
return (rows > 0) ? true : false;
}
public bool DeleteEmployee(Employee employee)
{
int rows;
using (SqlConnection con = new SqlConnection(myConn))
{
con.Open();
using (SqlCommand com = new SqlCommand(DeleteQuery, con))
{
com.Parameters.AddWithValue("@EmpId", employee.EmpId);
rows = com.ExecuteNonQuery();
}
 }
return (rows > 0) ? true : false;
}
 }
  }
We have now completed all the operations and are able to Insert, Update, Delete and Retrieve the employee details using the methods.
Step 11: How can we do the CRUD operations using windows forms?
Double click the “Add” button, It will automatically open the Form1.cs and create the below click event method and we need to write a logic over here. All the buttons have their click events when we click on that button the related event trigger on that time.
private void btnAdd_Click(object sender, EventArgs e)
{
}
using System;
using System.Windows.Forms;
namespace EmployeeDetails{
public partial class Form1 : Form{
Employee employee = new Employee();
public Form1()
{
InitializeComponent();
dgvEmployeeDetails.DataSource = employee.GetEmployees();
}
// Add employee details when clicks the Add button
private void btnAdd_Click(object sender, EventArgs e)
{
employee.EmpId = txtEmpId.Text;
employee.EmpName = txtEmpName.Text;
employee.Age = txtAge.Text;
employee.ContactNo = txtContactNo.Text;
employee.Gender = cboGender.SelectedItem.ToString();
// Call Insert Employee method to insert the employee details to database
var success = employee.InsertEmployee(employee); // Refresh the grid to show the updated employee details dgvEmployeeDetails.DataSource = employee.GetEmployees();
if (success)
{
// Clear controls once the employee is inserted successfully
ClearControls();
MessageBox.Show("Employee has been added successfully");
}else
MessageBox.Show("Error occured. Please try again...");
}
// Update selected employee details when clicks the update button
private void btnUpdate_Click(object sender, EventArgs e)
{
employee.EmpId = txtEmpId.Text;
employee.EmpName = txtEmpName.Text;
employee.Age = txtAge.Text;
employee.ContactNo = txtContactNo.Text;
employee.Gender = cboGender.SelectedItem.ToString();
// Call Update Employee method to update the selected employee details to database
var success = employee.UpdateEmployee(employee);
// Refresh the grid to show the updated employee details
dgvEmployeeDetails.DataSource = employee.GetEmployees();
if (success)
{
// Clear controls once the employee is inserted successfully
ClearControls();
MessageBox.Show("Employee has been added successfully");
}
else
MessageBox.Show("Error occured. Please try again...");
}
// Delete selected employee when clicks the delete button
private void btnDelete_Click(object sender, EventArgs e)
{
employee.EmpId = txtEmpId.Text;
// Call DeleteEmployee method to delete the selected employee from database
var success = employee.DeleteEmployee(employee);
// Refresh the grid to show the updated employee details
dgvEmployeeDetails.DataSource = employee.GetEmployees();
if (success)
{
// Clear controls once the employee is inserted successfully
ClearControls();
MessageBox.Show("Employee has been added successfully");
}else
MessageBox.Show("Error occured. Please try again...");
}
// Clear all controls when clicks clear button
private void btnClear_Click(object sender, EventArgs e)
{
ClearControls();
}private void ClearControls()
{
txtEmpId.Text = "";
txtEmpName.Text = "";
txtAge.Text = "";
txtContactNo.Text = "";
cboGender.Text = "";
}
// This data grid event triggers when select the grid rows and populate the controls with selected employee details
private void dgvEmployeeDetails_RowHeaderMouseClick(object sender, DataGridViewCellMouseEventArgs e)
{
var index = e.RowIndex;
txtEmpId.Text = dgvEmployeeDetails.Rows[index].Cells[0].Value.ToString();
txtEmpName.Text = dgvEmployeeDetails.Rows[index].Cells[1].Value.ToString();
txtAge.Text = dgvEmployeeDetails.Rows[index].Cells[2].Value.ToString();
txtContactNo.Text = dgvEmployeeDetails.Rows[index].Cells[3].Value.ToString();
cboGender.Text = dgvEmployeeDetails.Rows[index].Cells[4].Value.ToString();
}
 }
  }
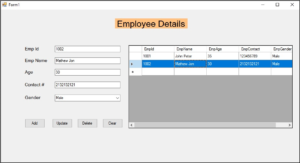
Output:
Add employee details and Click the “Add” button,
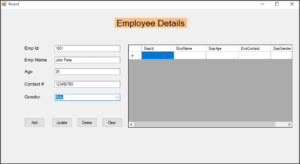
The employee details are successfully inserted.

When you select the grid row (employee), selected employee details will be populated in the controls for Update or Delete purposes.
So in this way, we can easily create a C# Windows Application and a Database that connects together, and then we can perform basic CRUD operations on it. I hope you all now learnt the process.
