Create, Read, Update and Delete (CRUD) Operation with React JS and Spring Boot. In this article, we will learn how to perform CRUD Operations with React JS, Spring Boot, and REST API, and MYSQL using the class component in React JS.
Some of the basic RestAPI methods that will use in these examples, GET, POST, PUT and DELETE and the meaning of these methods are too simple as the name suggests.
Following are the methods available in REST API CRUD
- GET: To read a resource.
- POST: To add a resource.
- PUT: To update a resource.
- DELETE: To delete a resource.
Tools and Technologies
- React JS
- Spring Boot
- MYSQL Database
- Spring Data JPA
CRUD Operation with React JS and Spring Boot
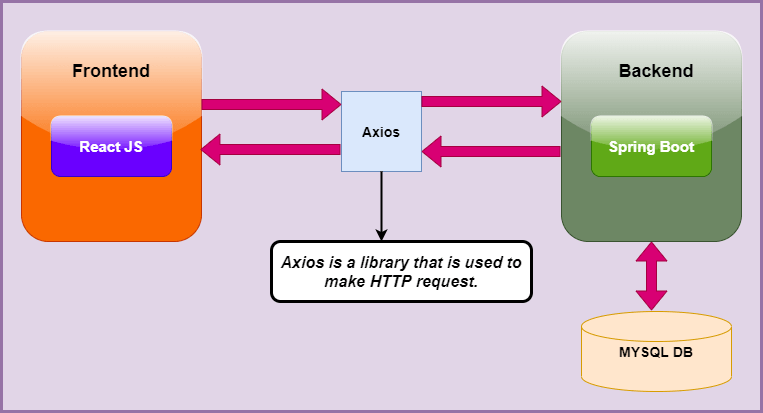
We will develop a simple Blog Application where we will have the functionality of adding a blog, removing a blog, view a blog list, and update the blog. We will create the frontend using React JS and the backend using Spring boot.
Here, we will use Axios, which is a library that is used to make HTTP requests to a given endpoint.
Let us divide the development process into two parts:
- Frontend: React JS
- Backend: Spring Boot
Create Backend Part using Spring Boot and MYSQL
Create a Database
The first step is to create a database name ‘db_demo’ using the MYSQL command line or Workbench.
Create database db_demo
Create Project
Create a project using Spring Initializr. If you don’t know how to create a project using the same check this article https://codedec.com/tutorials/how-to-create-spring-boot-project-using-spring-initializr/

Import a Project
Now, it’s time to import the project into STS. Go to File > Import > Maven > Existing Maven Project > Next > Browse > Select the project > Finish. Now it will take time to import the project and will import all the dependencies in case you added.
Here, we will follow the Spring Boot Architecture as shown in the following diagram

Create Project Structure as shown below

Configure application. properties file
# change the port
server.port=8889
#Database Configrations
spring.datasource.url=jdbc:mysql://localhost:3306/db_demo
spring.datasource.driver-class-name=com.mysql.cj.jdbc.Driver
spring.datasource.username=root
spring.datasource.password=root
spring.jpa.database-platform = org.hibernate.dialect.MySQL8Dialect
spring.jpa.generate-ddl=true
spring.jpa.hibernate.ddl-auto = update
- server.port is set to 8889.
- spring.datasource.url is used to set the URL of the MYSQL DB.
- Here, we set the username using spring.datasource.username and password using spring.datasource.password
- Next, we have the driver class name set using spring.datasource.driver-class-name.
- spring.jpa.database-platform is set to org.hibernate.dialect.MySQL8Dialect
- spring.jpa.properties.hibernate.format_sql is set to true.
- To make the changes in the database, we set the spring.jpa.hibernate.ddl-auto to update.
Create a Model Class
Here, we will create a Model class called Blog.java. I have used the Lombok library to remove boilerplate code. In case you want to know what is Lombok check this article https://codedec.com/tutorials/how-to-configure-lombok-into-eclipse/
package com.codebun.blog.model;

import java.sql.Timestamp;
import java.util.Date;

import javax.persistence.Column;
import javax.persistence.Entity;
import javax.persistence.GeneratedValue;
import javax.persistence.GenerationType;
import javax.persistence.Id;
import javax.persistence.Table;
import javax.persistence.Temporal;
import javax.persistence.TemporalType;

import lombok.AllArgsConstructor;
import lombok.Getter;
import lombok.NoArgsConstructor;
import lombok.Setter;
@Entity
@Table(name = "blogapp")
@Setter
@Getter
@AllArgsConstructor
@NoArgsConstructor
public class Blog {

 @Id
 @GeneratedValue(strategy = GenerationType.IDENTITY)
 private long id;
 @Column(name = "blog_name")
 private String blogName;
 @Column(name = "description")
 private String description;
 @Column(name = "created_date")
 @Temporal(TemporalType.DATE)
 private Date createdDate;

}
- @Entity annotation mark this class as a JPA entity. It tells hibernate to make a table out of it.
- @Id annotation specifies the primary key of an entity.
- @GeneratedValue is for the primary key.
- @Column annotation the property of the class with the table column.
Create Repository Interface
Now, we will create a Data Access Layer.
package com.codebun.blog.repository;

import org.springframework.data.jpa.repository.JpaRepository;
import org.springframework.stereotype.Repository;

import com.codebun.blog.model.Blog;
@Repository
public interface BlogRepository extends JpaRepository<Blog, Long> {

}
Create a Service Layer
Now we will create a service layer that will handle the business logic.
BlogService Interface
package com.codebun.blog.service;

import java.util.List;

import com.codebun.blog.model.Blog;

public interface BlogService {

 public Blog addBlog(Blog blog);

 public List<Blog> getAllBlog();

 public Blog updateBlog(Blog blog);

 public void delete(long id);

 public Blog getBlogById(long id);
}
BlogServiceImpl Class
package com.codebun.blog.service;

import java.util.List;

import org.springframework.beans.factory.annotation.Autowired;
import org.springframework.stereotype.Service;

import com.codebun.blog.model.Blog;
import com.codebun.blog.repository.BlogRepository;
@Service
public class BlogServiceImpl implements BlogService{

 @Autowired
 private BlogRepository blogRepository;
 @Override
 public Blog addBlog(Blog blog) {
  // TODO Add a Blog
  return blogRepository.save(blog);
 }
 @Override
 public List<Blog> getAllBlog() {
  // TODO List of All Blogs
  return blogRepository.findAll();
 }
 @Override
 public Blog updateBlog(Blog blog) {
  // TODO update a blog
  Blog blog2 = blogRepository.findById(blog.getId()).get();
  if(blog2!=null) {
   blog2.setBlogName(blog.getBlogName());
   blog2.setDescription(blog.getDescription());
   blog2.setCreatedDate(blog.getCreatedDate());
   blogRepository.save(blog2);
  }
  return blog2;
 }
 @Override
 public void delete(long id) {
  // TODO Auto-generated method stub
  blogRepository.deleteById(id);;
 }
 @Override
 public Blog getBlogById(long id) {
  // TODO Auto-generated method stub
  return blogRepository.findById(id).get();
 }
}
Create a Controller
The client request is sent to the controller which acts as an API layer that will have the endpoints for REST API.
package com.codebun.blog.controller;

import java.util.List;

import org.springframework.beans.factory.annotation.Autowired;
import org.springframework.http.HttpStatus;
import org.springframework.http.RequestEntity;
import org.springframework.http.ResponseEntity;
import org.springframework.web.bind.annotation.CrossOrigin;
import org.springframework.web.bind.annotation.DeleteMapping;
import org.springframework.web.bind.annotation.GetMapping;
import org.springframework.web.bind.annotation.PathVariable;
import org.springframework.web.bind.annotation.PostMapping;
import org.springframework.web.bind.annotation.PutMapping;
import org.springframework.web.bind.annotation.RequestBody;
import org.springframework.web.bind.annotation.RestController;

import com.codebun.blog.model.Blog;
import com.codebun.blog.service.BlogService;
@CrossOrigin(origins="http://localhost:3000")
@RestController
public class BlogController {

 @Autowired
 private BlogService service;
 @PostMapping("/api/blog")
 public ResponseEntity<Blog> createBlog(@RequestBody Blog blog){
  return new ResponseEntity<Blog>(service.addBlog(blog),HttpStatus.OK);
 }
 @GetMapping("/api/blog")
 public List<Blog> getBlog(){
  return service.getAllBlog();
 }
 @GetMapping("/api/blog/{id}")
 public ResponseEntity<Blog> getBlogById(@PathVariable("id") long id){
  return new ResponseEntity<Blog>(service.getBlogById(id),HttpStatus.OK);
 }
 @PutMapping("/api/blog/{id}")
 public ResponseEntity<Blog> updateBlog(@PathVariable("id") long id,@RequestBody Blog blog){
  return new ResponseEntity<Blog>(service.updateBlog(blog),HttpStatus.OK);
 }
 @DeleteMapping("/api/blog/{id}")
 public ResponseEntity<Blog> deleteBlog(@PathVariable ("id") long id){
  service.delete(id);
  return new ResponseEntity<Blog>(HttpStatus.OK);
 }
}
Here, Mark this class as @RestController and @CrossOrigin.
Run the Application
Now, go to the main class and run the application as a Spring Boot App.
package com.codebun.blog;

import org.springframework.boot.SpringApplication;
import org.springframework.boot.autoconfigure.SpringBootApplication;

@SpringBootApplication
public class BlogAppApplication {

 public static void main(String[] args) {
  SpringApplication.run(BlogAppApplication.class, args);
 }
}
Now, you can test the APIs using POSTMAN as we have done here


Create Frontend Part using ReactJS
Now, we will create a frontend part of the application using React JS. Open Cmd prompt > Go to the folder where you want to create a project with the help of command prompt codes > enter the command npx create-react-app blogapp-frontend.
- Now, open Visual Studio Code IDE and open the blogapp-frontend app.
- Here, you will see all the required folders and files.
We will be using bootstrap in React JS. So, open the terminal of VS code and type the following command
D:\Job Stuff\My_Study\React JS\blogapp-frontend>npm install bootstrap
You have to install React Bootstrap also by using the following command
D:\Job Stuff\My_Study\React JS\blogapp-frontend> npm install react-bootstrap
Install Axios library that is going to make a request to the endpoints which we have created at the backend.
D:\Job Stuff\My_Study\React JS\blogapp-frontend> npm install axios
Install react-router-dom using the following command
D:\Job Stuff\My_Study\React JS\blogapp-frontend> npm install react-router-dom
Following is the Project Structure

First, create a style.css file inside the src/component folder
.bg-bg{
    background-color: #f44336;
}
.font-ch{
    font-family: Arial, Helvetica, sans-serif;
    font-weight: bolder;
    font-style: inherit;
}
.card-font{
    font-family: 'Gill Sans', 'Gill Sans MT', Calibri, 'Trebuchet MS', sans-serif;
    font-size: larger;
    font-display: initial;
    font-weight: bolder;
}
Create MenuBar.js
import React, { Component } from 'react'
import { Link } from 'react-router-dom'
import  './style.css'

class MenuBar extends Component {
    render() {
        return (
            <div>
                <nav class="navbar navbar-expand-lg navbar-dark bg-bg">
  <div class="container-fluid">
    <Link class="navbar-brand font-ch" href="#" to="/">BLOG APP</Link>
    <button class="navbar-toggler" type="button" data-bs-toggle="collapse" data-bs-target="#navbarSupportedContent" aria-controls="navbarSupportedContent" aria-expanded="false" aria-label="Toggle navigation">
      <span class="navbar-toggler-icon"></span>
    </button>
    <div class="collapse navbar-collapse" id="navbarSupportedContent">
      <ul class="navbar-nav me-auto mb-2 mb-lg-0">
      <li class="nav-item">
          <Link class="nav-link active" aria-current="page" href="#" to="/">VIEW BLOGS</Link>
        </li>
        <li class="nav-item">
          <Link class="nav-link active" aria-current="page" href="#" to="/create-blog">ADD BLOG</Link>
        </li>

      </ul>
    </div>
  </div>
</nav>
            </div>
        )
    }
}
export default MenuBar
Inside App.js add all the components
import logo from './logo.svg';
import './App.css';
import MenuBar from './component/MenuBar';
import BlogComponent from './component/BlogComponent';
import CreateBlogComponent from './component/CreateBlogComponent';
import {BrowserRouter, Route, Switch} from 'react-router-dom';
import UpdateBlogComponent from './component/UpdateBlogComponent';
function App() {
  return (
    <BrowserRouter>
    <div className="App">
       <MenuBar/>
       <Switch>
        <Route exact path='/'><BlogComponent/></Route>
        <Route exact path='/create-blog'><CreateBlogComponent/></Route>
        <Route exact path='/update-blog/:id' component={UpdateBlogComponent}></Route>
         </Switch>
    </div>
    </BrowserRouter>
  );
}

export default App;
Create BlogService.js
Inside the src folder, create a components folder and add a BlogService.js and add the following lines of code. Here, we are making requests to the endpoints using the Axios library.
import React, { Component } from 'react'
import axios from 'axios'

class BlogServices {

    showBlogs(){
        return axios.get(`http://localhost:8889/api/blog`);
    }
    create = data =>{
        return axios.post(`http://localhost:8889/api/blog`,data)
    }
    getById = id =>{
        return axios.get(`http://localhost:8889/api/blog/${id}`)
    }
    delete = id =>{
        return axios.delete(`http://localhost:8889/api/blog/${id}`)
    }
    update = (id,data) =>{
        return axios.put(`http://localhost:8889/api/blog/${id}`,data)
    }
}
export default new BlogServices
Create BlogComponent.js
Inside the src folder, create a components folder and add a BlogComponent.js and add the following lines of code. This will show the list of Blogs and the option to delete and update it.
import React, { Component } from 'react'
import { Link } from 'react-router-dom';
import BlogServices from '../service/BlogServices';
class BlogComponent extends Component {
    // Step 1:
    constructor(props) {
        super(props);
        this.state = {
            blog: []
        };
    }
    //Step 2:
    componentDidMount() {
        BlogServices.showBlogs().then((Response) => {
            this.setState({ blog: Response.data })
        });

    }
    deleteBlog = (id) => {
        BlogServices.delete(id).then(
            (response) => {
                alert("Record Deleted Successfully");
                this.setState({
                    blog: this.state.blog.filter(b => b.id !== id)
                });
            }, (error) => {
                alert("Operation Failed Here");
            }
        );
    };
    render() {
        return (
            <div>
                <div className="container">
                    {this.state.blog.length === 0 ? "No Record " :
                    this.state.blog.map((blog,index) =>(
                    <div class="card" style={{ margin: "2rem" }} key={blog.id}>
                        <div class="card-body">
                        <h5 class="card-title">#{index+1}</h5>
                            <h5 class="card-title">{blog.blogName}</h5>
                            <p class="card-text">{blog.description}</p>
                            <h6 className="card-text">{blog.createdDate}</h6>
                            <div class="d-grid gap-2">
                                <Link class="btn btn-info" type="button" to={`/update-blog/${blog.id}`}>Update</Link>
                                <button class="btn btn-danger" onClick={()=>{this.deleteBlog(blog.id)}}>Delete</button>
                            </div>
                        </div>
                    </div>
                    ))}
                </div>
            </div>
        )
    }
}

export default BlogComponent

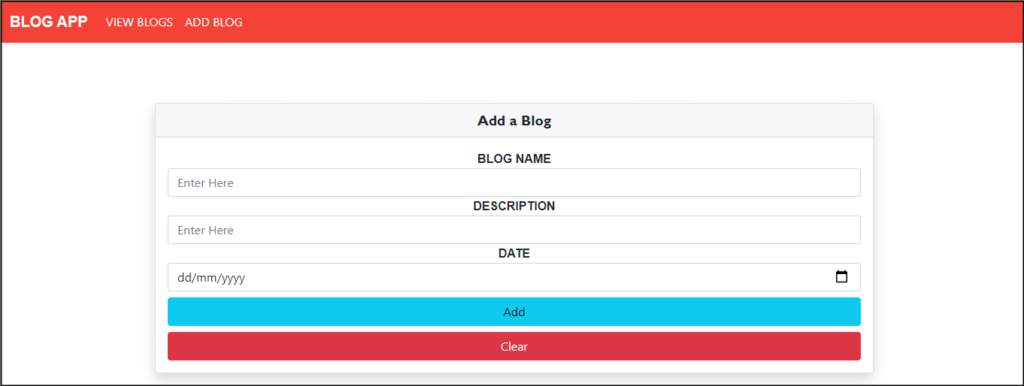
Create CreateBlogComponent.js
Now, create a CreateBlogComponent.js file inside the src/component folder to add a Blog.
import React, { Component } from 'react'
import BlogServices from '../service/BlogServices';
import './style.css'

class CreateBlogComponent extends Component {
    constructor(props){
        super(props);
        this.state = {blogName: '', description: '', createdDate: ''};
    }
    onInputChange = e => {
        this.setState({
            [e.target.name]:e.target.value
        });
    }
    formHandle = e =>{

        e.preventDefault();
        const blog = {
            blogName:this.state.blogName,
            description:this.state.description,
            createdDate:this.state.createdDate
        } ;
        BlogServices.create(blog).then(
            (response) =>{
                console.log(response);
                alert("Blog Added Successfully");
            } ,(error) =>{
                console.log(error);
                alert("Operation Failed");
            }
        );

    }
    render() {
        const {blogName,description,createdDate} = this.state
        return (
            <div>
                <div className="container">
                    <div class="card shadow bg-bg" style={{ margin: "5rem" }}>
                        <div class="card-header card-font">
                            Add a Blog
                        </div>
                        <div class="card-body">
                        <form onSubmit={this.formHandle}>
                        <div class="form-group">
                            <label for="exampleInputEmail1" className="font-ch">BLOG NAME</label>
                            <input type="text" class="form-control" name="blogName"   placeholder="Enter Here" value={blogName} onChange={this.onInputChange} />
                        </div>
                        <div class="form-group">
                            <label for="exampleInputPassword1" className="font-ch">DESCRIPTION</label>
                            <input type="text" class="form-control" name="description"   placeholder="Enter Here" value={description} onChange={this.onInputChange}/>
                        </div>
                        <div class="form-group">
                            <label for="exampleInputPassword1" className="font-ch">DATE</label>
                            <input type="date" class="form-control" name="createdDate"  placeholder="Enter Here" value={createdDate} onChange={this.onInputChange}/>
                        </div>
                        <div class="d-grid gap-2 mt-2">
                                <button class="btn btn-info" type="submit">Add</button>
                                <button class="btn btn-danger" type="reset">Clear</button>
                            </div>
                    </form>
                        </div>
                    </div>
                </div>
            </div>
        )
    }
}
export default CreateBlogComponent
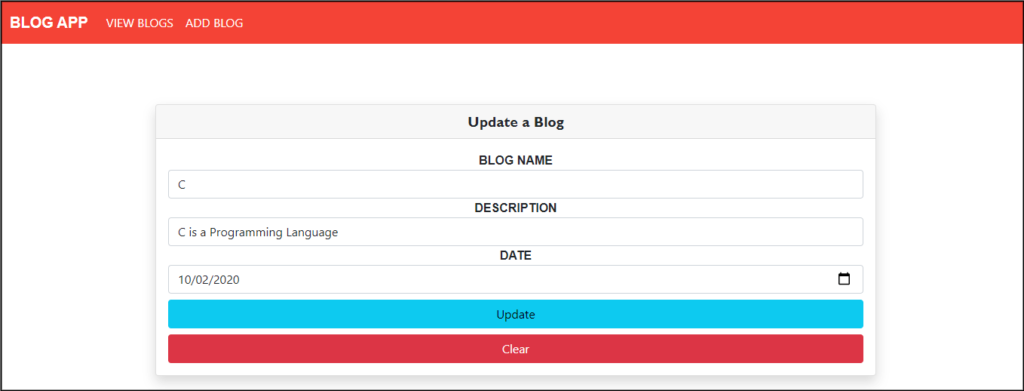
Create UpdateBlogComponent.js
Now, create UpdateBlogComponent.js inside the src/component folder and perform the Update Action.
import axios from 'axios';
import React, { Component } from 'react'
import BlogServices from '../service/BlogServices';

class UpdateBlogComponent extends Component {
    constructor(props){
        super(props);
        this.state = {id:'',blogName: '', description: '', createdDate: ''};
    }
    componentDidMount(){
        //get book id
        const blogId = +this.props.match.params.id;
        if(blogId > 0){
            this.getBlogByid(blogId);
        }

    }
    getBlogByid = (blogId) =>{
        BlogServices.getById(blogId).then
        ((response) =>{
            console.log(response);
             this.setState({
                id:response.data.id,
                blogName:response.data.blogName,
                description:response.data.description,
                createdDate:response.data.createdDate
             });
        },(error) =>{
            console.log(error);
                alert("Operation Failed");
        }
        );
    }
    onInputChange = e => {
        this.setState({
            [e.target.name]:e.target.value
        });
    }
    formHandle = e =>{

        e.preventDefault();
        const blog = {
            id:this.state.id,
            blogName:this.state.blogName,
            description:this.state.description,
            createdDate:this.state.createdDate
        } ;
        BlogServices.update(this.state.id,blog).then(
            (response) =>{
                console.log(response);
                alert("Blog Updated Successfully");
            } ,(error) =>{
                console.log(error);
                alert("Operation Failed");
            }
        );

    }
    render() {
        const {blogName,description,createdDate} = this.state
        return (
            <div>
                <div className="container">
                    <div class="card shadow bg-bg" style={{ margin: "5rem" }}>
                        <div class="card-header card-font">
                            Update a Blog
                        </div>
                        <div class="card-body">
                        <form onSubmit={this.formHandle}>
                        <div class="form-group">
                            <label for="exampleInputEmail1" className="font-ch">BLOG NAME</label>
                            <input type="text" class="form-control" name="blogName"   placeholder="Enter Here" value={blogName} onChange={this.onInputChange} />
                        </div>
                        <div class="form-group">
                            <label for="exampleInputPassword1" className="font-ch">DESCRIPTION</label>
                            <input type="text" class="form-control" name="description"   placeholder="Enter Here" value={description} onChange={this.onInputChange}/>
                        </div>
                        <div class="form-group">
                            <label for="exampleInputPassword1" className="font-ch">DATE</label>
                            <input type="date" class="form-control" name="createdDate"  placeholder="Enter Here" value={createdDate} onChange={this.onInputChange}/>
                        </div>
                        <div class="d-grid gap-2 mt-2">
                                <button class="btn btn-info" type="submit">Update</button>
                                <button class="btn btn-danger" type="reset">Clear</button>
                            </div>
                    </form>
                        </div>
                    </div>
                </div>
            </div>
        )
    }
}
export default UpdateBlogComponent
Run the React JS app by going to the terminal and enter the following command
D:\Job Stuff\My_Study\React JS\blogapp-frontend> npm start
Now, Use the application and perform all the CRUD operations.
In case you face this error Access to XMLHttpRequest at ‘http://localhost:8889/api/blog’ from origin ‘http://localhost:3000’ has been blocked by CORS policy: don’t forget to add the@CrossOrigin(origins=”http://localhost:3000″) annotation inside the controller class. The port number should be the same as where your react app is running.
Now, during the update, If you are getting a ‘Cannot read property of ‘id’ undefined‘ error then in the App.js add the UpdateBlogComponent.js in the way as shown below.
<Route exact path='/update-blog/:id' component={UpdateBlogComponent}></Route>
In this way, we learn How to perform CRUD operations with React JS at the frontend, Spring Boot at the backend, and using MYSQL as a database.
ReactJs and Spring boot Practice Tasks
https://codebun.com/how-to-insert-data-into-mysql-using-react-js-and-spring-boot/
https://codebun.com/delete-record-from-a-table-in-react-js-spring-boot-and-mysql/
https://codebun.com/search-record-from-a-table-in-react-js-spring-boot-and-mysql/
https://codebun.com/how-to-create-a-pagination-in-react-js-and-spring-boot/
https://codebun.com/how-to-create-spring-boot-and-reactjs-application/
https://codebun.com/edit-and-update-records-in-react-js-using-spring-boot-and-mysql/
