In this article, we will implement Aspect-Oriented Programming with Spring boot. To know complete detail on Spring Boot AOP check this article Introduction to Spring Boot AOP
Spring AOP @Before and @After Advice type Example in Spring Boot
In this example, we will learn @Before and @After annotation of the Spring AOP module.
Tools and Technologies used:
- Spring Boot
- Spring Tool Suite 4
- JDK8
- POSTMAN
Implement Spring AOP Advice in Spring Boot
Let’s create a simple spring boot application to implement Spring AOP advice. below are the steps to create simple Spring boot application.
Step 1: Open IDE STS- Spring Tool Suite
Step 2: Go to File > Spring Starter Project.

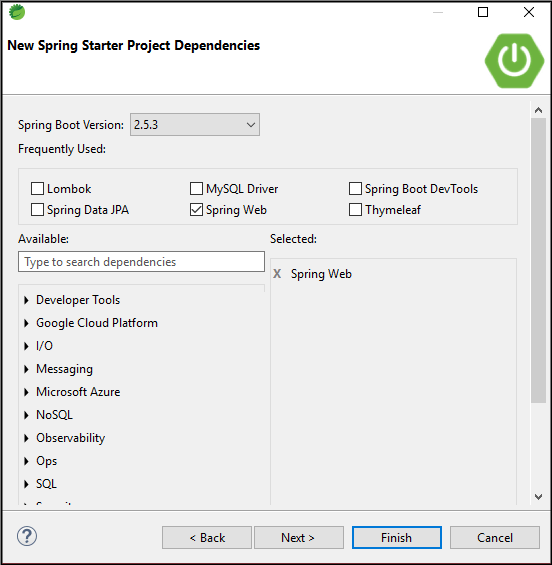
Step 3: Now, fill all the fields as shown below and click Next.

Step 4: Now, Add the dependencies of spring web.
Now, wait for some time and your project structure will be ready. Go to the pom.xml file and add the following Spring AOP dependency.
<dependency>
   <groupId>org.springframework.boot</groupId>
   <artifactId>spring-boot-starter-aop</artifactId>
</dependency>
Configure application. properties file
change the port number
server.port=8888
Create an Entity Class
In this class, we took 3 fields namely id, accHolerName, and balance. Generate Getters and setters and also generate default and parameterized constructors.
Account.java
package com.abc.example.model;

public class Account {

 private long id;
 private String accHolderName;
 private long balance;
 public Account() {
  super();
  // TODO Auto-generated constructor stub
 }
 public Account(long id, String accHolderName, long balance) {
  super();
  this.id = id;
  this.accHolderName = accHolderName;
  this.balance = balance;
 }
 public long getId() {
  return id;
 }
 public void setId(long id) {
  this.id = id;
 }
 public String getAccHolderName() {
  return accHolderName;
 }
 public void setAccHolderName(String accHolderName) {
  this.accHolderName = accHolderName;
 }
 public long getBalance() {
  return balance;
 }
 public void setBalance(long balance) {
  this.balance = balance;
 }

}
Create a Service Layer
This layer is responsible for business logic. This class has two methods depositMoney() & withdrawMoney()
AccountService
package com.abc.example.service;

import org.springframework.stereotype.Service;

import com.abc.example.model.Account;
@Service
public class AccountService {

 public Account depositMoney(long id, String accHolderName, long balance) {
  // TODO Auto-generated method stub
  Account account = new Account();
  System.out.println("hello service");
  account.setId(id);
  account.setAccHolderName(accHolderName);
  account.setBalance(5000);
  return account;
 }

 public Account withdrawMoney(long balance) {
  // TODO Auto-generated method stub
    //Withdraw...
  return null;

 }

}
Create a Controller class
The request will be handle by the handler methods in the controller class using @GetMapping. In this class, we define two mapping- one for deposit and another for withdrawal.
package com.abc.example.controller;

import org.springframework.beans.factory.annotation.Autowired;
import org.springframework.web.bind.annotation.RequestMapping;
import org.springframework.web.bind.annotation.RequestMethod;
import org.springframework.web.bind.annotation.RequestParam;
import org.springframework.web.bind.annotation.ResponseBody;
import org.springframework.web.bind.annotation.RestController;

import com.abc.example.model.Account;
import com.abc.example.service.AccountService;

@RestController
public class AccountController {

 @Autowired
 private AccountService accountService;
 @RequestMapping(value = "/add/money",method = RequestMethod.GET, produces = "application/json")
 public @ResponseBody Account deposit(@RequestParam("id") long id,@RequestParam("accHolderName") String accHolderName,@RequestParam("balance") long balance) {
  System.out.println("in");
  return accountService.depositMoney(id,accHolderName,balance);

 }
 @RequestMapping(value = "/withdraw/money",method = RequestMethod.GET, produces = "application/json")
 public @ResponseBody String withdraw(@RequestParam("balance") long balance) {
   accountService.withdrawMoney(balance);
   return "Balance Withdrawn..";

 }
}
- Mark this class as @RestController(It is used to simplify the creation of REST APIs).
- The @GETMapping is used to map HTTP GET requests on specific handler methods.
- The @RequestBody is used to convert JSON to Java objects.
- The @ResponseEntity represents an HTTP response.
- Here, @RequestParam is used to extract query parameter
Next, the important part is the Aspect class to define advice and implement AOP.
Create Aspect Class
AccountServiceAspect
package com.abc.example.aspectpkg;

import org.aspectj.lang.annotation.After;
import org.aspectj.lang.annotation.Aspect;
import org.aspectj.lang.annotation.Before;
import org.aspectj.lang.annotation.Pointcut;
import org.springframework.stereotype.Component;

@Aspect
@Component
public class AccountServiceAspect {

 //Write a Pointcut
 @Pointcut("execution(public * com.abc.example.service.AccountService.depositMoney(..))")
 public void h1() {
 }
 @Before("h1()")  //<-- Links advice + Pointcuts = Advice
 public void beginTransaction() {
  System.out.println("BEGIN TRANSACTION...");
 }
 @After("h1()")  //<-- Links advice + Pointcuts = Advice
 public void commitTransaction() {
  System.out.println("END TRANSACTION...");
 }
}
- @Aspect is used to mark the class as Aspect class.
- @Pointcut annotation is used to define the expression that will select the business method.
- @Before annotation specifies that the advice should be executed before the joinpoint.
- @After annotation specifies that the advice should be executed after the joinpoint.
Now, Go to the Application class and annotate it with @EnableAspectJAutoProxy. It enables support for handling components marked with AspectJ’s @AspectJ annotation.
package com.abc.example;

import org.springframework.boot.SpringApplication;
import org.springframework.boot.autoconfigure.SpringBootApplication;
import org.springframework.context.annotation.EnableAspectJAutoProxy;

@SpringBootApplication
@EnableAspectJAutoProxy
public class SpringBootAopPractice2Application {

 public static void main(String[] args) {
  SpringApplication.run(SpringBootAopPractice2Application.class, args);
 }

}
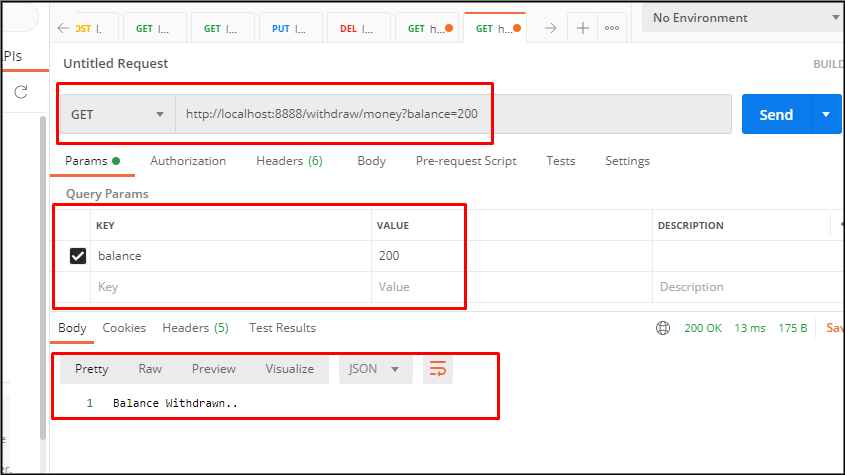
Run the Application class and test it using POSTMAN.

See the console window of your STS and you will see the following advice:

In this way, we have implemented AOP in spring boot.
