In this tutorial, we will learn How to send emails from the C# Windows Application or how to create an email application using Visual C sharp as a Desktop Application. What is SMTP? Sending mail through Gmail in Visual Basic. How to solve the error which you will be getting in Sending Email Application in C# Windows Application.
What is SMTP?
The full form of SMTP is the Simple Mail Transfer Protocol. This is a protocol for sending e-mail messages between servers. This is basically an Internet standard for electronic mail (e-mail) transmission. The default TCP port used by SMTP is 25 they can differ in different systems and the SMTP connections secured by SSL.
SMTP Authentication
It provides a set of protocols that simplify the communication of email messages between email servers. Most SMTP server names are written in the form “smtp.domain.com” or “mail.domain.com”: for example, a Gmail account will refer to smtp.gmail.com. Most email systems that send mail over the Internet use SMTP to send messages from one server to another, the messages can be retrieved with an email client using either POP or IMAP.
You must provide your email address in the place of “username@gmail.com” and the real password of your given Gmail account in the place of “password” for Network credentials.
Sending Email through Gmail in C# Windows Application
How do I send mail using the C# Windows Application?
Visual C# uses SMTP protocol for sending emails. SMTP stands for Simple Mail Transfer Protocol. Visual C# using System.Net.Mail namespace for sending mail. We can instantiate SmtpClient class and assign the Host and Port.
Using Gmail Server:
The Gmail SMTP server name is smtp.gmail.com and the port using send mail is 587. Here using Network Credential for password-based authentication.
Here we have to provide the information like our Gmail username and password, and then to address also.
The below example demonstrates how to send mail using the SmtpClient class. The following points to be noted in this are −
- We must specify the SMTP host server that you use to send e-mails. The Host and Port properties will be different for the different host servers. We will be using a Gmail server.
- We need to give the Credentials for authentication if required by the SMTP server.
- We should also provide the email address of the sender and the e-mail address or addresses of the recipients using the MailMessage.From and MailMessage.To properties, respectively.
- We should also specify the message content using the MailMessage.Body property.
Example:
In this example, we will create a simple application that would send an e-mail, here we will send an email to ourselves for testing the application. Use the following steps −
Step 1:
Open your Visual Studio > Go to File Menu > Click on New Project > Select Visual C# Windows Application > Name the Project and then > Click on OK.

Step 2:
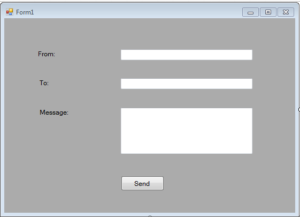
On Form1 Take three labels, three text boxes, and one-button control from the toolbox.

Change the text properties of the labels to – ‘From:‘, ‘To:‘ and ‘Message:‘ respectively. Change the text property of the button control to ‘Send‘.
Step 3:
First of all add the following namespaces on top of the code window.
using System.Net;
using System.Net.Mail;
Then go to Solution Explorer> Right-click on your project> then click on Add Reference >in the Add Reference dialogue box Click on the .Net Tab and select the System.Net and click on Add. After adding the reference our solution explorer window will look something like this.

Step 4:
Double click on the Send button and add the following code there.
private void button1_Click(object sender, EventArgs e)
        {
try
            {
                MailMessage msg = new MailMessage();
                msg.From = new MailAddress(textBox1.Text);
                msg.To.Add(textBox2.Text);
                msg.Body = textBox3.Text;
                SmtpClient smtp = new SmtpClient();
                smtp.Host = "smtp.gmail.com";
                System.Net.NetworkCredential ntcd = new NetworkCredential();
                ntcd.UserName = "Username@gmail.com";
                ntcd.Password = "Password";
                smtp.Credentials = ntcd;
                smtp.EnableSsl = true;
                smtp.Port = 587;
                smtp.Send(msg);
                MessageBox.Show("Your Email Has Send!");

            }
            catch (Exception ex)
            {
                MessageBox.Show(ex.Message);
            }
}
You must provide your email address in the place of “Username@gmail.com” and a real password in the place of “Password” for Network credentials.
Step 5:
Run the Application.
Output:
When we press F5 and run the application. First, we will see the Form1 just shown below image Fill your email address in From field and other person’s email address in the field of To whom you want to send mail. Write the message in the message field and click on the Send button. The message will be sent to that person and it will show the message box with the text “Your Email has Sent!”. As shown in the below image.

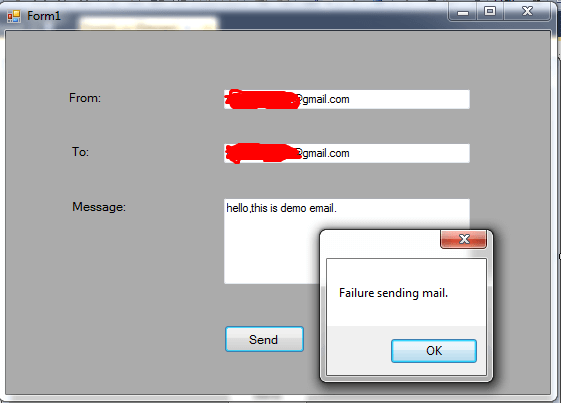
It will only show the output as shown in the below image if we are not connected to the internet or else our connection is not secure. It will show the exception message “Failure sending mail.”
Here in this example we have trying to send emails to ourselves that is why we fill our email address in both fields of Text Boxes in From: and To:
when you will enter your email address in both the textboxes then write any text or message in the field of Message. Then click on the Send button. If the message will have been sent to your email address successfully then the message box will show the message “Your Email Has Sent!” and the output will be the same as the above output1 image. Else if it didn’t send then you will see an error window something like this.
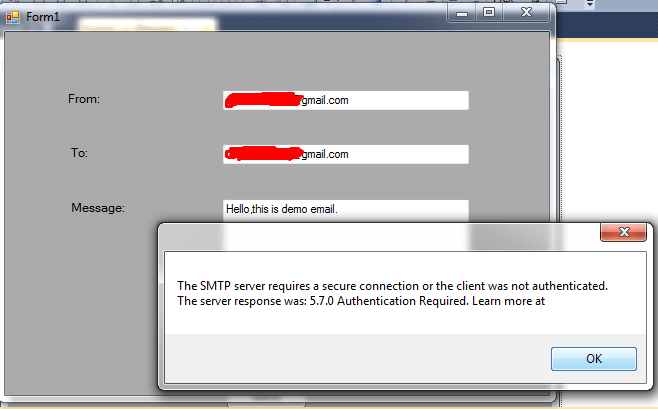
Error while sending mail in C#
In this window, it will show the error to correct that is some Authentication Required.
Then we have to do the required authentication for that follow these steps-
- First go to your Google account > Setting.
- Then click on Security Settings.
- Find the option Less Secure App Access turn On this option.

Now go back to our application again and fill in your email address in both fields again write the text in the message field and then click on the send button. The message box will appear that shows “Your Email Has Sent!”.
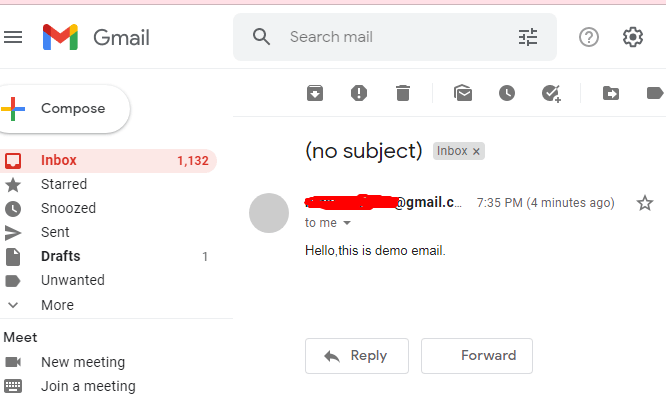
Then check your Gmail box you will find the same message has been sent to you. You can clearly see in the below image that the message I have sent is delivered in my mailbox from my email address to myself, here I am a sender and also I am a recipient.
If you were also not able to send messages so by using this setting you will be able to send easily. Do try yourself.
