In this post, we will learn how to upload and download any image in a VB.NET application using Database. We can use different DBMS system for this here I am using MySQL database you can use as per your choice.
Upload and Download/Retrieve Image in VB.NET Application using MySQL Database
Here we will create a windows form application in VB.NET that will allow users to upload an image in a picture box and store in MySQL Database and also retrieve or download image from the database into the picture box.
Step 1:
Create an SQL database on MySQL name the database “test” add the table in the database and name it “tblimageblob” with below data types-
CREATE DATABASE `test`
CREATE TABLE `test`.`tblimageblob` ( `ImageID` INT NOT NULL AUTO_INCREMENT ,`Caption` VARCHAR(255) NOT NULL , `ImageFile` LONGBLOB NOT NULL , PRIMARY KEY(`ImageID`)) ENGINE = InnoDB;
Step 2:
Create a new Visual Basic Windows project in Visual Studio with two forms It’s by default name will be Form1 and Form2 if you want to change you can do this.

Design your Form1 and Form2 like below add required controls from the toolbox–
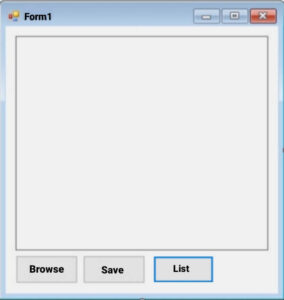
Form1 Design:
I have taken one picture box and 3 Button controls on it.
Form2 Design:
Here I have taken gridview control ,2 Buttons ,one label ,one Textbox and one picture box.

Step 3:
add Imports MySql.Data.MySqlClient and Imports System.IO above the public class of Form1 and also on Form2 for your imports. Your mysql class will not work without it.
Imports System.IO
Imports MySql.Data.MySqlClient
Dim conn As New MySqlConnection
Dim Myconnection As String = "server=localhost;user id=root;password=root;database=test"
Browse Button code:
Private Sub btnBrowse_Click(sender As Object, e As EventArgs) Handles btnBrowse.Click
        Try
            With OpenFileDialog1

                'CHECK THE SELECTED FILE IF IT EXIST OTHERWISE THE DIALOG BOX WILL DISPLAY A WARNING.
                .CheckFileExists = True

                'CHECK THE SELECTED PATH IF IT EXIST OTHERWISE THE DIALOG BOX WILL DISPLAY A WARNING.
                .CheckPathExists = True

                'GET AND SET THE DEFAULT EXTENSION
                .DefaultExt = "jpg"

                'RETURN THE FILE LINKED TO THE LNK FILE
                .DereferenceLinks = True

                'SET THE FILE NAME TO EMPTY
                .FileName = ""

                'FILTERING THE FILES
                .Filter = "(*.jpg)|*.jpg|(*.png)|*.png|(*.jpg)|*.jpg|All files|*.*"
                'SET THIS FOR ONE FILE SELECTION ONLY.
                .Multiselect = False


                'SET THIS TO PUT THE CURRENT FOLDER BACK TO WHERE IT HAS STARTED.
                .RestoreDirectory = True

                'SET THE TITLE OF THE DIALOG BOX.
                .Title = "Select a file to open"

                'ACCEPT ONLY THE VALID WIN32 FILE NAMES.
                .ValidateNames = True

                If .ShowDialog = DialogResult.OK Then
                    Try
                        PictureBox1.Image = Image.FromFile(OpenFileDialog1.FileName)
                    Catch fileException As Exception
                        Throw fileException
                    End Try
                End If

            End With
        Catch ex As Exception
            MsgBox(ex.Message, MsgBoxStyle.Exclamation, Me.Text)
        End Try
    End Sub
Now double click on the save button add the below code their.
Save Button code:
Private Sub btnSave_Click(sender As Object, e As EventArgs) Handles btnSave.Click
        Dim con As MySqlConnection = New MySqlConnection("server=localhost;user id=root;password=root;database=test;sslMode=none")
        Dim cmd As MySqlCommand
        Dim sql As String
        Dim result As Integer
        Dim caption As String
        Dim arrImage() As Byte
        Dim mstream As New System.IO.MemoryStream()

        caption = System.IO.Path.GetFileName(OpenFileDialog1.FileName)
        'SPECIFIES THE FILE FORMAT OF THE IMAGE
        PictureBox1.Image.Save(mstream, System.Drawing.Imaging.ImageFormat.Jpeg)

        'RETURNS THE ARRAY OF UNSIGNED BYTES FROM WHICH THIS STREAM WAS CREATED
        arrImage = mstream.GetBuffer()

        'GET THE SIZE OF THE STREAM IN BYTES
        Dim FileSize As UInt32
        FileSize = mstream.Length
        'CLOSES THE CURRENT STREAM AND RELEASE ANY RESOURCES ASSOCIATED WITH THE CURRENT STREAM
        mstream.Close()
        Try
            con.Open()
            sql = "INSERT INTO  `tblimageblob` (`Caption`, `ImageFile`) VALUES (@Caption, @ImageFile)"
            cmd = New MySqlCommand
            With cmd
                .Connection = con
                .CommandText = sql
                .Parameters.AddWithValue("@Caption", caption)
                .Parameters.AddWithValue("@ImageFile", arrImage)
                result = .ExecuteNonQuery()
            End With
            If result > 0 Then
                MsgBox("Record has been Add")
            Else
                MsgBox("Error query", MsgBoxStyle.Exclamation)
            End If
        Catch ex As Exception
            MsgBox(ex.Message)
        Finally
            con.Close()
        End Try

    End Sub
Now go to the Form2 and add the same imports Classes above the public class that earlier we have also added in the Form1. After that click on the Retrieve button and add the below code their.
Retrieve Button code:
Private Sub btnRetrieve_Click(sender As Object, e As EventArgs) Handles btnRetrieve.Click
Try
            con.Open()
            cmd = New MySqlCommand
            With cmd
                .Connection = con
                .CommandText = "SELECT ImageID,Caption FROM tblimageblob"
            End With
            da = New MySqlDataAdapter
            da.SelectCommand = cmd
            dt = New DataTable
            da.Fill(dt)

            With dtglist
                .DataSource = dt
            End With

        Catch ex As Exception
            MsgBox(ex.Message)
        Finally
            da.Dispose()
            con.Close()
        End Try
End Sub
And now click on the View Image button and add the following code their.
View Image Button code:
Private Sub btnView_Image_Click(sender As Object, e As EventArgs) Handles btnView_Image.Click
Try
            con.Open()
            cmd = New MySqlCommand
            With cmd
                .Connection = con
                .CommandText = "SELECT Caption,ImageFile FROM tblimageblob WHERE ImageID=" & Val(dtglist.CurrentRow.Cells(0).FormattedValue)
            End With
            da = New MySqlDataAdapter
            dt = New DataTable
            Dim arrImage() As Byte

            da.SelectCommand = cmd
            da.Fill(dt)

            txtCaption.Text = dt.Rows(0).Item(0)
            arrImage = dt.Rows(0).Item(1)
            Dim mstream As New System.IO.MemoryStream(arrImage)
            PictureBox1.Image = Image.FromStream(mstream)

        Catch ex As Exception
            MsgBox(ex.Message)
        Finally
            da.Dispose()
            con.Close()
        End Try
End Sub
Step 4:
Now press F5 to run this application. First thing we will see the Form1 when we click on browse button the file dialogue box will open where we have to choose one image from it. When it done it will look like below as it will adjust to the picture box.

Now when we click on the save button then the picture from the picture box will send to the database and save their and the popup message window will appear like this.

After that when we click on the list button the result would be like this as seen below when we choose one name from the grid the picture which is related to that caption will appear in the picture box with their related caption.

Now you can see how our application is working.
So in this way you can also create this application for image Uploading and Downloading in VB.NET with MySQL database.
