How to iterate over the list in Thymeleaf in the Spring boot project? In this article, we will learn How to iterate over the list in Thymeleaf in the Spring boot project?
While creating a web application in Spring boot many times you have to show the list of data at a view layer. So, this data can come from the database or list you have created on the service layer. In order to iterate over the list of data in thyme leaf, we have to use the ‘th: each’ attribute.
th-each in Thymeleaf
Example: The following code will iterate over the list of persons. The model attribute from the controller is accessed using ${} notation.{here model attribute will be passed}
<tr th:each="person: ${persons}">
    <td th:text="${person.id}" />
    <td th:text="${person.name}" />
    <td th:text="${person.address}" />
</tr>
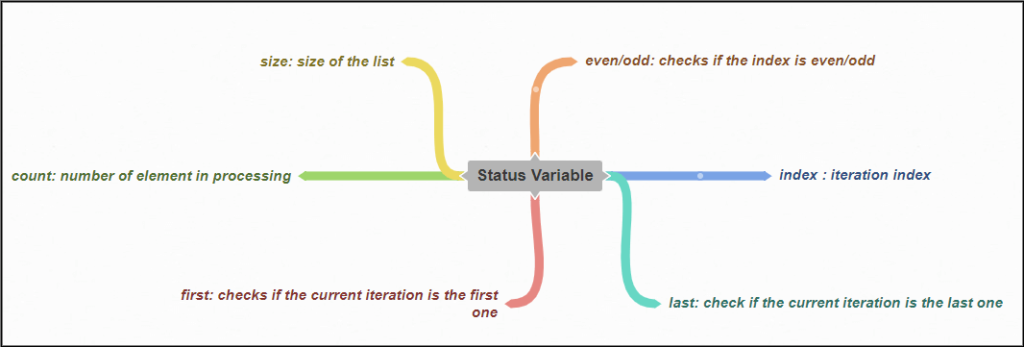
Status Variable in th: each in Thymeleaf
Next, is the Status Variable which records the iteration process by using a variable. Following are the properties of status variables:
How to iterate list in Thymeleaf in Spring boot
Let’s create a simple spring boot application to integrate the list items in Thymeleaf.
Step 1: Open IDE STS- Spring Tool Suite
Step 2: Go to File > Spring Starter Project.

Step 3: Now, fill all the fields as shown below and click Next.

Step 4: Now, Add the dependencies of Thymeleaf and spring web and click Next > Finish.

Now, wait for some time and your project structure will be ready. Go to the pom.xml file and you will see the following dependency being added automatically.
<dependency>
   <groupId>org.springframework.boot</groupId>
   <artifactId>spring-boot-starter-thymeleaf</artifactId>
</dependency>
<dependency>
   <groupId>org.springframework.boot</groupId>
   <artifactId>spring-boot-starter-web</artifactId>
</dependency>
<dependency>
   <groupId>org.projectlombok</groupId>
   <artifactId>lombok</artifactId>
   <optional>true</optional>
</dependency>
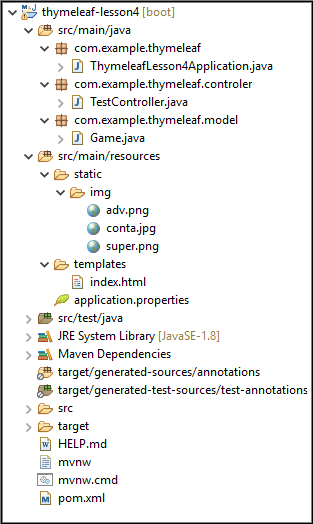
Project Structure
Configure application. properties file
#change the port number
server.port=8888
Create a Controller
Create a TestController to handle requests. The request for the web page will be handle by the handler methods in the controller.
TestController
package com.example.thymeleaf.controler;

import java.util.ArrayList;
import java.util.List;

import org.springframework.stereotype.Controller;
import org.springframework.ui.Model;
import org.springframework.web.bind.annotation.GetMapping;

import com.example.thymeleaf.model.Game;

@Controller
public class TestController {

 @GetMapping("/")
 public String home(Model model) {
  Game game1 = new Game(101,"Super Mario","1985","Nintendo","super.png");
  Game game2 = new Game(102,"Contra","1987","Nintendo","conta.jpg");
  Game game3 = new Game(103,"Adventure Island","1986","Hudson Soft","adv.png");
  List<Game> list = new ArrayList<Game>();
  list.add(game1);
  list.add(game2);
  list.add(game3);
  model.addAttribute("list", list);
  return "index";
 }
}
- @Controller annotation marks the TestController class a Request Handler.
- Every request coming for the ‘/’ URL will be handled by the home() method. It would redirect you to the index page.
- Create an object of the Game class and add it to the list and then pass the list into the model inside the home() method.
Note: Make Sure, here the image file name we are passing that should be present in your src/main/resources/static/img/ folder.
Create a Model class
This class is created to hold the data of the application (to model the data of the application)
Game.java
package com.example.thymeleaf.model;

import lombok.AllArgsConstructor;
import lombok.Getter;
import lombok.NoArgsConstructor;
import lombok.Setter;


@Getter
@Setter
@AllArgsConstructor
@NoArgsConstructor
public class Game {

 private int id;
 private String name;
 private String launchYear;
 private String developer;
 private String image;
}
- Take five fields id, name, launchYear, developer, and price.
- I have used the Lombok library to remove boilerplate code. In case you want to know what is Lombok check this article https://codedec.com/tutorials/how-to-configure-lombok-into-eclipse/
Create a Template
index.html
In the spring boot application, adding a thymeleaf template is quite simple. Go to src/main/resources/template folder and create an index.html file.
<!DOCTYPE html>
<html xmlns:th="www.thymeleaf.org">
<head>
<meta charset="ISO-8859-1">
<title>Iterate</title>
<link href="https://cdn.jsdelivr.net/npm/bootstrap@5.1.0/dist/css/bootstrap.min.css" rel="stylesheet" integrity="sha384-KyZXEAg3QhqLMpG8r+8fhAXLRk2vvoC2f3B09zVXn8CA5QIVfZOJ3BCsw2P0p/We" crossorigin="anonymous">
<script src="https://cdn.jsdelivr.net/npm/@popperjs/core@2.9.3/dist/umd/popper.min.js" integrity="sha384-eMNCOe7tC1doHpGoWe/6oMVemdAVTMs2xqW4mwXrXsW0L84Iytr2wi5v2QjrP/xp" crossorigin="anonymous"></script>
<script src="https://cdn.jsdelivr.net/npm/bootstrap@5.1.0/dist/js/bootstrap.min.js" integrity="sha384-cn7l7gDp0eyniUwwAZgrzD06kc/tftFf19TOAs2zVinnD/C7E91j9yyk5//jjpt/" crossorigin="anonymous"></script>
</head>
<body style="background-color: #f0f4c3">
<div class="container mt-5">
<h3 align="center">Iterate over List in Thymeleaf</h3>
<table class="table table-bordered ">
  <thead class="table-dark">
    <tr>
      <th scope="col">#</th>
      <th scope="col">Image</th>
      <th scope="col">Id</th>
      <th scope="col">Name</th>
      <th scope="col">Year</th>
      <th scope="col">Developer</th>
    </tr>
  </thead>
  <tbody class="table-success">
    <tr th:each="gameList : ${list}">
      <th scope="row" th:text="${gameListStat.index+1}"></th>
      <td><img th:src="@{|/img/${gameList.image}|}" height="60px" width="60px"></td>
      <td th:text="${gameList.id}"></td>
      <td th:text="${gameList.name}"></td>
      <td th:text="${gameList.launchYear}"></td>
      <td th:text="${gameList.developer}"></td>
    </tr>
  </tbody>
</table>
</div>
</body>
</html>
Here, the th: each attribute is used to iterate over the list of games. The model attribute is accessed using ${} notation.
Now, Run the ThymeleafLesson4Application class and Go to localhost:8888 and see the following output.

In this way, we have learned how to iterate over the list in thymeleaf in a spring boot project.
