Spring Boot Upload and Download Example using Thymeleaf. In this article, we will learn how to upload and download a file from a database. Also, we will see how to display images from the database.
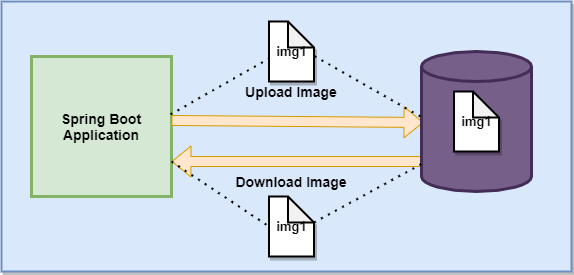
Uploading and Downloading Images is one of the important parts of any application. As we know, we use the Spring Boot to make the development process easy. So, here we will create an example to upload and download files from a database. We will be using the thymeleaf template at the view layer. Spring Data JPA will be used at the data access layer. The relational database here is MYSQL.
Spring Boot Upload and Download File Example using Thymeleaf
In this example, we will create a view where we will look at how to upload and download a file.
Step 1: Open IDE STS- Spring Tool Suite
Step 2: Go to File > Spring Starter Project.

Step 3: Now, fill all the fields as shown below and click Next.

Step 4: Now, Add the dependencies of Thymeleaf, spring data JPA, Lombok, and spring web and click Next > Finish.

Now, wait for some time and your project structure will be ready. Go to the pom.xml file and you will see the following dependencies will be added automatically
<dependencies>
  <dependency>
   <groupId>org.springframework.boot</groupId>
   <artifactId>spring-boot-starter-data-jpa</artifactId>
  </dependency>
  <dependency>
   <groupId>org.springframework.boot</groupId>
   <artifactId>spring-boot-starter-thymeleaf</artifactId>
  </dependency>
  <dependency>
   <groupId>org.springframework.boot</groupId>
   <artifactId>spring-boot-starter-web</artifactId>
  </dependency>
  <dependency>
   <groupId>mysql</groupId>
   <artifactId>mysql-connector-java</artifactId>
   <scope>runtime</scope>
  </dependency>
  <dependency>
   <groupId>org.projectlombok</groupId>
   <artifactId>lombok</artifactId>
   <optional>true</optional>
  </dependency>
  <dependency>
   <groupId>org.springframework.boot</groupId>
   <artifactId>spring-boot-starter-test</artifactId>
   <scope>test</scope>
  </dependency>
 </dependencies>
Create a Database in MYSQL
mysql> create database db_demo;
Configure application. properties file
# change the port
server.port=8888
#Database Configrations
spring.datasource.url=jdbc:mysql://localhost:3306/db_demo
spring.datasource.driver-class-name=com.mysql.cj.jdbc.Driver
spring.datasource.username=root
spring.datasource.password=root
spring.jpa.database-platform = org.hibernate.dialect.MySQL8Dialect
spring.jpa.generate-ddl=true
spring.jpa.hibernate.ddl-auto = update

#Multipart
spring.servlet.multipart.enabled=true
spring.servlet.multipart.file-size-threshold=2KB
spring.servlet.multipart.max-file-size=200MB
spring.servlet.multipart.max-request-size=215MB
- spring.jpa.hibernate.ddl-auto is set to update so that whatever changes we will do will be reflected in the schema.
- spring.datasource.url is used to set the URL of the MYSQL DB.
- spring.datasource.username is used to set the username and spring. datasource. password is used to set the password.
- spring.datasource.driver-class-name is used to set the driver class name.
- spring.jpa.show-sql is set to true to show SQL generated by the Hibernate.
- spring.jpa.properties.hibernate.dialect is used to generate better SQL for the chosen database.
- spring.jpa.properties.hibernate.format_sql is set to true to format SQL queries.
- server.port is set to 8888.
- spring.servlet.multipart.enabled It is set to true to give support for multipart.
- spring.servlet.multipart.file-size-threshold is used to set the maximum size of the file. After the threshold size, the file will be written to the disc.
- spring.servlet.multipart.max-file-size denotes max file size.
- spring.servlet.multipart.max-request-size denotes total request size.
Create a Model Class
Student.java
package com.example.thymeleaf.model;

import javax.persistence.Entity;
import javax.persistence.GeneratedValue;
import javax.persistence.GenerationType;
import javax.persistence.Id;
import javax.persistence.Table;

import lombok.AllArgsConstructor;
import lombok.Getter;
import lombok.NoArgsConstructor;
import lombok.Setter;

@Entity
@Table(name = "student")
@Setter
@Getter
@AllArgsConstructor
@NoArgsConstructor
public class Student {

 @Id
 @GeneratedValue(strategy = GenerationType.IDENTITY)
 private long id;
 private String profilePicture;
 private long size;
 private byte [] content;
}
- @Entity is used to annotate the classes to indicate that they are JPA entities.
- @Table annotation is used to specify the name of the table that should be mapped with entities.
- @Id annotation is used for the primary key.
- I have used the Lombok library to remove boilerplate code. In case you want to know what is Lombok check this article https://codedec.com/tutorials/how-to-configure-lombok-into-eclipse/
In the database, it will show like this
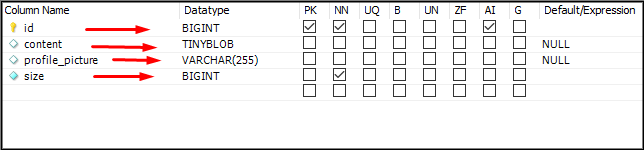
Now, change the TinyBLOB datatype to medium Blob using the MYSQL workbench.
Create Repository Interface
The repository here is the DAO layer, which performs all the database operations. StudentRepository interface is created which will extend JPARepository<ClassName, ID>.
package com.example.thymeleaf.repository;

import org.springframework.data.jpa.repository.JpaRepository;

import com.example.thymeleaf.model.Student;

public interface StudentRepository extends JpaRepository<Student, Long> {

}
Create a Service Layer
Here, create three methods to save student Info, to retrieve student Info, and to get Student Info by id.
StudentService.java
package com.example.thymeleaf.service;

import java.util.List;
import java.util.Optional;

import org.springframework.beans.factory.annotation.Autowired;
import org.springframework.stereotype.Service;

import com.example.thymeleaf.model.Student;
import com.example.thymeleaf.repository.StudentRepository;

@Service
public class StudentService {

 @Autowired
 private StudentRepository repository;
 public Student createStudent(Student student) {
  return repository.save(student);

 }
 public List<Student> getAllStudent(){
  return repository.findAll();

 }

 public Optional<Student> findStudentById(long id){
  return repository.findById(id);
 }
}
Create a Controller class
The request for the web page will be handle by the handler methods in the controller class using @GetMapping.
package com.example.thymeleaf.controller;

import java.io.IOException;
import java.util.List;
import java.util.Optional;

import javax.servlet.ServletException;
import javax.servlet.ServletOutputStream;
import javax.servlet.http.HttpServletResponse;

import org.springframework.beans.factory.annotation.Autowired;
import org.springframework.data.repository.query.Param;
import org.springframework.stereotype.Controller;
import org.springframework.ui.Model;
import org.springframework.web.bind.annotation.GetMapping;
import org.springframework.web.bind.annotation.PathVariable;
import org.springframework.web.bind.annotation.PostMapping;
import org.springframework.web.bind.annotation.RequestParam;
import org.springframework.web.bind.annotation.ResponseBody;
import org.springframework.web.multipart.MultipartFile;

import com.example.thymeleaf.model.Student;
import com.example.thymeleaf.service.StudentService;
import com.sun.xml.txw2.Document;

@Controller
public class StudentController {

 @Autowired
 private StudentService service;
 @GetMapping("/")
 public String home(Model model) {
  List<Student> list =  service.getAllStudent();
  model.addAttribute("list", list);
  return "index";
 }
 @PostMapping("/upload")
 public String fileUpload(@RequestParam("file") MultipartFile file,  Model model) throws IOException {
 Student student = new Student();
  String fileName = file.getOriginalFilename();
  student.setProfilePicture(fileName);
  student.setContent(file.getBytes());
  student.setSize(file.getSize());
  service.createStudent(student);
  model.addAttribute("success", "File Uploaded Successfully!!!");
  return "index";

 }


 @GetMapping("/downloadfile")
 public void downloadFile(@Param("id") Long id , Model model, HttpServletResponse response) throws IOException {
  Optional<Student> temp = service.findStudentById(id);
  if(temp!=null) {
   Student student = temp.get();
   response.setContentType("application/octet-stream");
   String headerKey = "Content-Disposition";
   String headerValue = "attachment; filename = "+student.getProfilePicture();
   response.setHeader(headerKey, headerValue);
   ServletOutputStream outputStream = response.getOutputStream();
   outputStream.write(student.getContent());
   outputStream.close();
  }
 }

 @GetMapping("/image")
 public void showImage(@Param("id") Long id, HttpServletResponse response, Optional<Student> student)
   throws ServletException, IOException {

  student = service.findStudentById(id);
  response.setContentType("image/jpeg, image/jpg, image/png, image/gif, image/pdf");
  response.getOutputStream().write(student.get().getContent());
  response.getOutputStream().close();
 }
}
@Controller annotation marks the StudentController class a Request Handler. Let us now break the above code and understand it.
Uploading File to Database
- First, inside the home() method, get the list of Students from the database and display it on the index.html page.
- Map the /upload request to the fileUpload() method. Inside it, get the file using Multipart and retrieve file information such as file name, file size.
- Set these fields to student entity and call the create Student() method of Service class.
@PostMapping("/upload")
 public String fileUpload(@RequestParam("file") MultipartFile file,  Model model) throws IOException {
 Student student = new Student();
  String fileName = file.getOriginalFilename();
  student.setProfilePicture(fileName);
  student.setContent(file.getBytes());
  student.setSize(file.getSize());
  service.createStudent(student);
  model.addAttribute("success", "File Uploaded Successfully!!!");
  return "index";

 }
Downloading File from Database
- Map the GET ‘/downloadfile’ request to the downloadFile() method. Inside it, first, get the id of a student.
- Add Content-Disposition in the response header.
- Add the content type as application/octet-stream.
@GetMapping("/downloadfile")
 public void downloadFile(@Param("id") Long id , Model model, HttpServletResponse response) throws IOException {
  Optional<Student> temp = service.findStudentById(id);
  if(temp!=null) {
   Student student = temp.get();
   response.setContentType("application/octet-stream");
   String headerKey = "Content-Disposition";
   String headerValue = "attachment; filename = "+student.getProfilePicture();
   response.setHeader(headerKey, headerValue);
   ServletOutputStream outputStream = response.getOutputStream();
   outputStream.write(student.getContent());
   outputStream.close();
  }
 }
Display File from Database
- Map the GET ‘/image’ request to the showImage() method. Inside it, first, get the id of a student.
- Add the content type as image/jpeg, image/jpg, image/png, image/gif, image/pdf .
@GetMapping("/image")
 public void showImage(@Param("id") Long id, HttpServletResponse response, Optional<Student> student)
   throws ServletException, IOException {

  student = service.findStudentById(id);
  response.setContentType("image/jpeg, image/jpg, image/png, image/gif, image/pdf");
  response.getOutputStream().write(student.get().getContent());
  response.getOutputStream().close();
 }
Create View using Thymeleaf
Go to src/main/resources/template folder and create an index.html file. Now inside the register.html file make sure to add the following code:
To know How to iterate over the list of an object in thymeleaf check this article Iterate list in Thymeleaf using Spring boot
<!DOCTYPE html>
<html xmlns:th="www.thymeleaf.org">
<head>
<link rel="stylesheet" href="https://cdnjs.cloudflare.com/ajax/libs/font-awesome/4.7.0/css/font-awesome.min.css">
<meta charset="ISO-8859-1">
<title>File Upload & Download</title>
<!-- CSS only -->
<link
 href="https://cdn.jsdelivr.net/npm/bootstrap@5.1.0/dist/css/bootstrap.min.css"
 rel="stylesheet"
 integrity="sha384-KyZXEAg3QhqLMpG8r+8fhAXLRk2vvoC2f3B09zVXn8CA5QIVfZOJ3BCsw2P0p/We"
 crossorigin="anonymous">
<!-- JavaScript Bundle with Popper -->
<script
 src="https://cdn.jsdelivr.net/npm/bootstrap@5.1.0/dist/js/bootstrap.bundle.min.js"
 integrity="sha384-U1DAWAznBHeqEIlVSCgzq+c9gqGAJn5c/t99JyeKa9xxaYpSvHU5awsuZVVFIhvj"
 crossorigin="anonymous"></script>
</head>
<body style="background-color: #f0f4c3">
 <div class="container text-center">
  <div>
   <h1>Spring Boot File Upload & Download</h1>
  </div>
   <div class="card" style="width: 18rem;" align="center">
      <div class="card-body" align="center">
        <h2 class="card-title">File Upload</h2>
        <h6 class="text-success">[[${success}]]</h6>
        <div class="mb-3">
          <form th:action="@{/upload}" method="post" enctype="multipart/form-data">
            <input
              class="form-control" name="file" type="file" id="formFile"><br />
            <input type="submit" value="Upload" class="btn btn-warning">
          </form>
        </div>
      </div>
     </div>
     <div class="container mt-5">
      <div class="card">
  <div class="card-body">
  <div class="row">
  <th:block th:each="studList: ${list}">
    <div class="col-sm-3">
     <div> <a th:href="@{'/downloadfile?id=' + ${studList.id}}"><i class="fa fa-download"></i></a></div>
     <div><img th:src="@{'/image?id='+ ${studList.id}}" width="100px" height="50px"></div>
 <div>[[${studList.profilePicture}]]</div>
 <div>([[${studList.size}]]) B</div>
    </div>
   </th:block>
  </div>
</div>
  </div>
</div>

 </div>
</body>
</html>
Now, Run the UploadAndDownloadApplication and Go to localhost:8888 and see the following output.
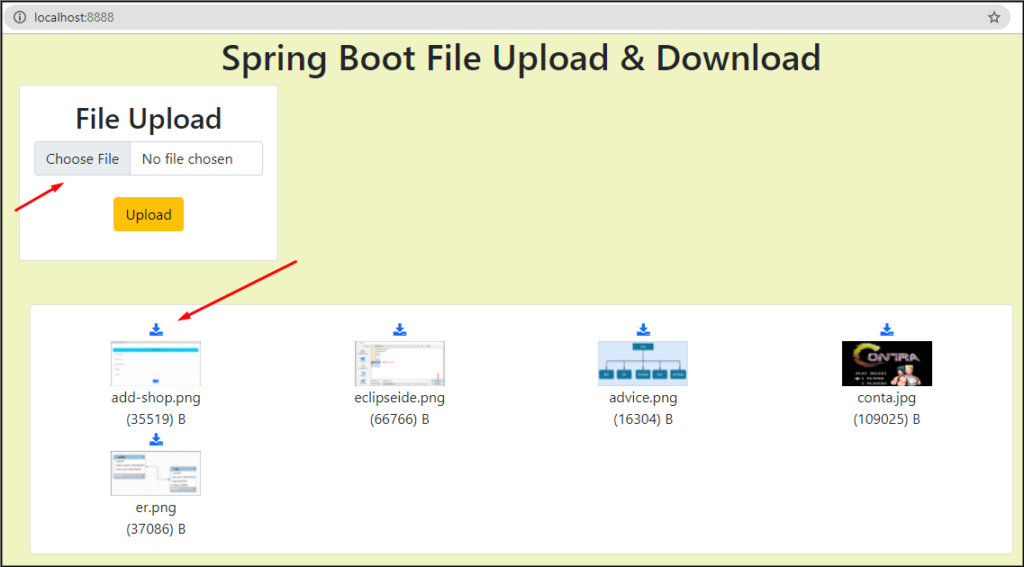
In this way, we learned how to upload, download, and display images from/to the database.
