In this post, you will learn how to upload and download any image in the C# windows application. So let’s start.
Uploading Image in C# Windows Application
Here what we will do is write some uploading code that takes our image in one form and by uploading it will display it on another form.
Step 1:
Open Your Visual Studio > Go to File menu > Select New Projects > then under Visual C# > select Windows Form Application.
We can change our project name and find that by browsing it on other locations after that click on the Ok button.

Step 2:
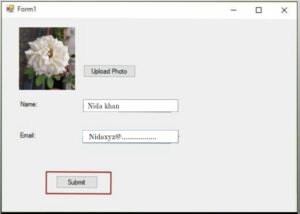
Open your Form1.cs file, where we have to create our design for Uploading Images. We will take one PictureBox, two labels, two buttons, and two textboxes from the toolbox and drag them into Form1.cs. After that, we will see our Form will look like this.

Step 3:
Now we will add another form in our project that is Form2.cs just go to> solution explorer >Right Click to your Project > Add New item >select Window Form and Add it.

Here we will add one PictureBox and two Labels from the toolbox just by dragging them into the Form2.cs.
Step 4:
On Form1.cs Right-click on the blank part and View the Code. Here we will see we have entered the coding part of the form. Now we will write the code for Form1.cs.
Form1.cs
using System;
using System.Collections.Generic;
using System.ComponentModel;
using System.Data;
using System.Drawing;
using System.Linq;
using System.Text;
using System.Threading.Tasks;
using System.Windows.Forms;
namespace UploadControl{
public partial class Form1 : Form{
public static string l1;
public static string l2;
public Form1()
{
InitializeComponent();
}
private void button1_Click(object sender, EventArgs e)
{
OpenFileDialog opnfd = new OpenFileDialog();
opnfd.Filter = "Image Files (*.jpg;*.jpeg;.*.gif;)|*.jpg;*.jpeg;.*.gif";
if (opnfd.ShowDialog()== DialogResult.OK)
{
pictureBox1.Image = new Bitmap(opnfd.FileName);
}
 }
private void button2_Click(object sender, EventArgs e)
{
l1 = textBox1.Text;
l2 = textBox2.Text;
Form2 frm2 = new Form2(pictureBox1.Image);
frm2.Show();
}
 }
  }
Form2.cs
using System;
using System.Collections.Generic;
using System.ComponentModel;
using System.Data;
using System.Drawing;
using System.Linq;
using System.Text;
using System.Threading.Tasks;
using System.Windows.Forms;
namespace UploadControl{
public partial class Form2:Form{
public Form2(Image pic1)
{
InitializeComponent();
pictureBox1.Image = pic1;
label1.Text = Form1.l1;
label2.Text = Form1.l2;
}
 }
  }
Step 5
When we click on the Upload Photo button then we will see File Dialog will open where we can browse our image in the picture box. We can select any picture and set it into the PictureBox, then we have to fill in the rest information and then press Submit Button.
we will see a Form2 will open and it will display all the details of Form1 with our image which we have uploaded. The output will look like this.

Fetching Images from the database into a picture box control
We have learned how to insert images into a database and now we will learn how to retrieve or fetch an image from our SQL database and display it in a picture box control using the c# windows application.
Follow the simple steps-
Step 1
Open Your Visual Studio > Go to File menu > Select New Projects > then under Visual C# > select Windows Form Application > and insert a picture box and a button into the form.
Step 2
To retrieve an image from the SQL Server database write the code in the coding section of a form by right click on the form. Here you came on the coding part of the form write the code here.
using System;
using System.Collections.Generic;
using System.ComponentModel;
using System.Data;
using System.Drawing;
using System.Linq;
using System.Text;
using System.Windows.Forms;
using System.Data.SqlClient;
using System.IO;
namespace insert_image_in_database
{
 public partial class Form2 : Form{
public Form2()
 {
InitializeComponent();
}
SqlConnection con;
SqlCommand cmd;
private void button1_Click(object sender, EventArgs e)
{
con = new SqlConnection("Data Source=MCNDESKTOP03;
Initial Catalog=nida;
User ID=na;
Password=khan@123");
con.Open();
cmd = new SqlCommand("select picname from pic where id=2", con);
SqlDataAdapter da = new SqlDataAdapter(cmd);
DataSet ds = new DataSet();
da.Fill(ds);
if (ds.Tables[0].Rows.Count > 0)
{
MemoryStream ms = new MemoryStream((byte[])ds.Tables[0].Rows[0]["picname"]);
pictureBox1.Image = new Bitmap(ms);
         }
      }
  }
}
Step 3
Now we have to run our application then click on the Display button to see the image. The image will display in the picture box which is taken by us in a form by giving their Id number in the query from the database.

If you want to choose any other image from your database then you have to give their Id in SQL query from the column of Id of your database. The query is given below.
cmd = new SqlCommand("select picname from pic where id=2", con);
If you want to choose on runtime which image should be displayed then you can also take user input on runtime by taking the Id value from the user on runtime in one TextBox and passing this TextBox value in this query so that the input id number will be set in id variable which will show the image in picture box whose Id it is.
So in this way, we can easily do the image Uploading and downloading task in C# Windows Application.
