There are many ways to Import Java maven projects. Here I’ll discuss some simple steps to import a Maven project. Java has lots of frameworks so very first we have to identify the type of project. It’s a web application or desktop application.
As you know maven support almost all kind of java application. It might be JSP and servlet J2ee project or it can we spring boot or Spring MVC project. Steps will be the same for all kinds of maven applications. there is 3 major step to import and run a Java Maven application.
- Import project into eclipse.
- Configure Server.
- Run the application on the browser.
Import Java maven project into eclipse
Let’s say we have a project war or a ZIP/RAR file of the project. If it is RAR or ZIP extract it and keep it in any folder in your drive and follow the following step to import into eclipse.
Steps to Import Java maven project into eclipse
- Make sure, JDK is installed in your machine with the required version.
- Run eclipse or STS.
- Go to File Menu and select the import option.
- Search Maven and select the option “Existing Maven Project”.
- Click next and under the root directory “enter or browser the path of the root folder of the project”.
- Check the pom.xml from the projects option.
- Click to finish and wait until the build is done.
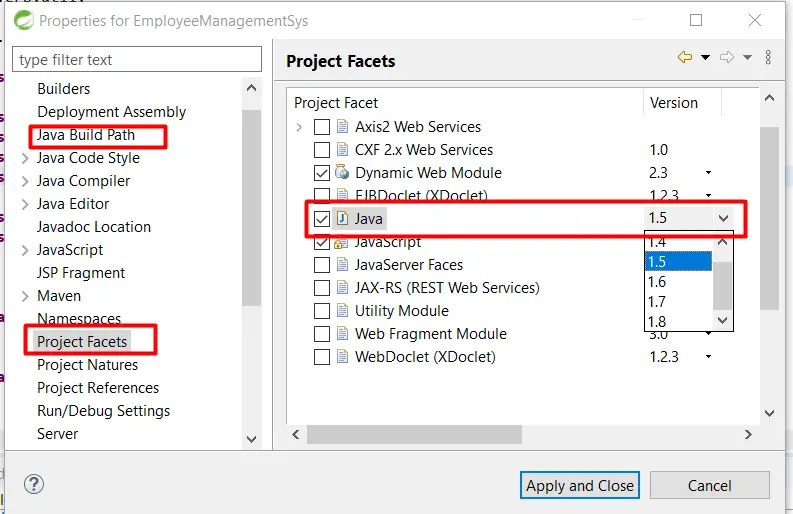
Update Java version for Maven Project
- Right-click on the root folder of the project in eclipse.
- Click to properties at the end of options.
- Go to project facets and update the Java version as required.
- Now Navigate to “Java Build Path”
- Select JRE system library
- Click to edit and update the java version for the build
Java maven project import is done also we have updated the required java version. now If the code is error-free. follow the below steps to configure the server and run this java project to get output.
Configure Tomcat Server with Java Maven Project
Step 1) Download Tomcat’s latest version or as per your requirements.
Step 2) Extract the File and copy it at any location in your machine for example let’s assume in “C drive” the path will be “C:\apache-tomcat-9.0.37”.
Step 3) In the top menu of the Eclipse goto Windows=>Show view=>Others=> Server and find the server window.
Step 4) Right click in the server window and select New=>server=>Apache=>Tomcat 8.5 Server=>Next.
Step 5) Browse the tomcat folder which we had copied in “C drive”. In my case path is “C:\apache-tomcat-9.0.37”
Step 6) Click to Next and Finish.
How to run Java Maven Web Project on tomcat Server
Step 1) Right-click on the root folder of the project and select “Run As” and follow it to click on “Run on server”.
Step 2) Click the option “Choose an existing server”
Step 3) Select the configured version of the tomcat server from the localhost.
Step 4) Click Next and Finish.
The project will run and run over the browser. By default, it will run on the internal browser of the eclipse.
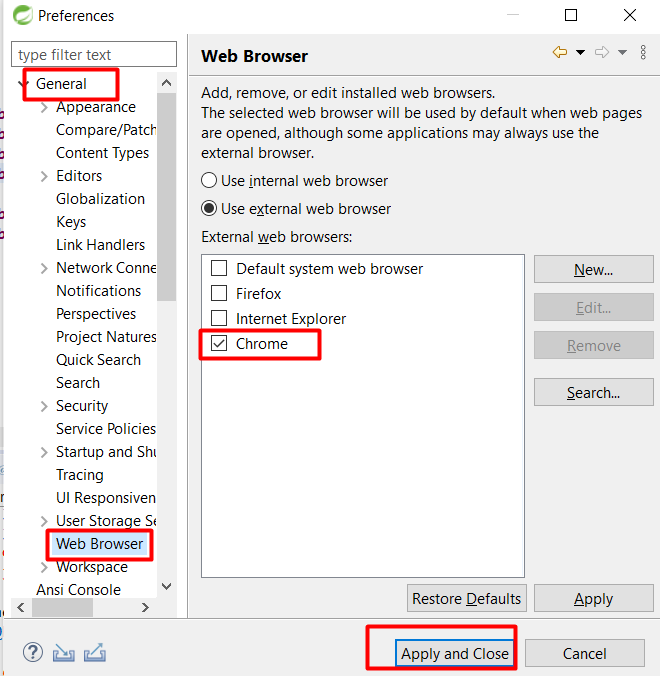
Can we change the Internal browser in eclipse to run a Java Project?
Yes, when we are any Java web project by default it will run over the internal browser of the eclipse or sts but yes we can change it in just some steps.
Step 1) Navigate to Windows==> Preferences ==>General ==> Web Browser
Step 2) Select Option “Use External web browser” and Check the browser on that you want to run the project.
Step 3) Congratulations it’s done just rerun the project.