CRUD Operation in Android using Firebase Database. In this article, we will learn how to perform CRUD Operations in Android using Firebase Database.
The Android SDK that we are going to use here is the set of development tools to develop applications for the android platform. The database we are using is Firebase which is a cloud-hosted database. So, let us start with the development.
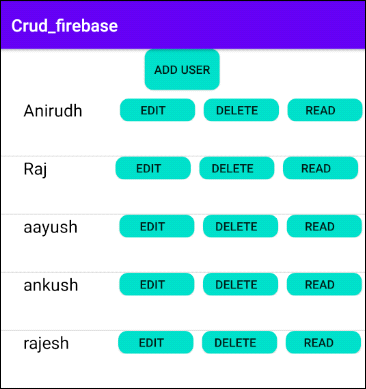
Crud Stands for Create, Read, Update and Delete operation in Sqlite. In this project, we are going to perform Create, Read, Update and Delete Operation in the FireBase database and we will display the list of users in the main activity with the help of RecyclerView.
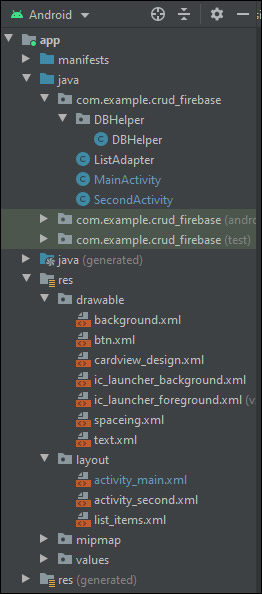
Following will be the project structure:
Step1: Getting Started With Android Studio
- Create a project with Empty activity.

Step 1.1: Adding dependencies
- Go to Gradle Scripts Click build.gradle(Module: app).

- Add dependencies.
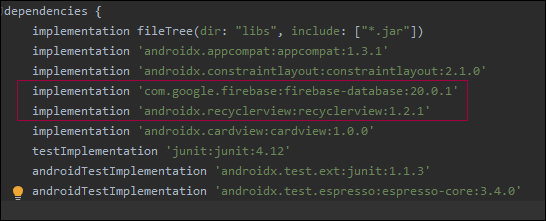
implementation 'com.google.firebase:firebase-database:20.0.1'
implementation 'androidx.recyclerview:recyclerview:1.2.1'
MainActivity.java
In this activity, we will Create the Main Page of our Application
- This page consists of a button and a Recycler View
- findViewById is used to assign View to Object
- Onclicklistener is set to login button when we click on login button following command execute
- We create new intent with the context of this and SecondActivity class to switch to Second class when startActivity(intent) is execute
- putExtra method is used to pass Key and Value pair with intent
- arrayList is an Object of ArrayList Class of type DBHelper which is our wrapper Class
- btnCreate is our Button on the main Activity which is used for inserting data in the firebase database
- FirebaseDatabase class gets an instance to access a location in the database through which we can read and write data
- getReference method is used to get to the parent node of the database
- DatabaseReference class is used to perform certain actions on the database we pass reference and instance to the databaseReference object and we can perform read and write operations on the database
- You can see we are using arrayList.clear(); function it is used to clean the arraylist we are doing it because if we jump to other activity and come back again to the main activity it will add all the users from the database to ArrayList again it will duplicate the values. In the getUsers(); method we are adding all the users from the database to ArrayList
- RecyclerView is a designing tool used to display a large set of data
- setAdapter method is used to pass a list to RecyclerView
- setOnClickListener is used to perform certain actions performed inside the onClick method
- we are using the getUser method to add data from firebase to ArrayList
- we use the addValueEventListener method on dataReference to listen to every data change in database
- DataSnapshot is a Snapshot of data (you can say that its array of data)
- In the loop, we are Looping through the snapshot. child method is used to refer to the database column name and getValue method is used to get value from that column and toString method is used to getValue to String type
- arrayList.add method is where we are adding userName, email and number to arrayList with the help of DBHelper wrapper class
- when the user press back pressed back button onBackPressed method will execute.
- finish method is used to kill current activity.
package com.example.crud_firebase;

import androidx.annotation.NonNull;
import androidx.appcompat.app.AppCompatActivity;
import androidx.recyclerview.widget.DividerItemDecoration;
import androidx.recyclerview.widget.LinearLayoutManager;
import androidx.recyclerview.widget.RecyclerView;
import android.app.Activity;
import android.content.Intent;
import android.os.Bundle;
import android.view.View;
import android.widget.Button;
import com.example.crud_firebase.DBHelper.DBHelper;
import com.google.firebase.database.DataSnapshot;
import com.google.firebase.database.DatabaseError;
import com.google.firebase.database.DatabaseReference;
import com.google.firebase.database.FirebaseDatabase;
import com.google.firebase.database.ValueEventListener;
import java.util.ArrayList;


public class MainActivity extends AppCompatActivity{

    private FirebaseDatabase firebaseDatabase;
    private DatabaseReference databaseReference;
    private static ArrayList<DBHelper> arrayList  = new ArrayList<>();
    private RecyclerView list;
    private Button btnCreate;
    public static Activity Fa;

    @Override
    protected void onCreate(Bundle savedInstanceState) {
        super.onCreate(savedInstanceState);
        setContentView(R.layout.activity_main);
        arrayList.clear();
        Fa =this;
        firebaseDatabase = FirebaseDatabase.getInstance();
        databaseReference =firebaseDatabase.getReference("Users");
        getUsers();
        btnCreate = findViewById(R.id.btn_CreateMain);
        list = findViewById(R.id.list);
        DividerItemDecoration dividerItemDecoration = new DividerItemDecoration(list.getContext(),
        new LinearLayoutManager(this).getOrientation());
        list.addItemDecoration(dividerItemDecoration);
        list.setLayoutManager(new LinearLayoutManager(this));
        list.setAdapter(new ListAdapter(arrayList,this ));
        btnCreate.setOnClickListener(new View.OnClickListener() {
            @Override
            public void onClick(View v) {
                Intent i = new Intent(MainActivity.this,SecondActivity.class);
                String s;
                s="Create";
                i.putExtra("Button",s);
                startActivity(i);
                finish();
            }
        });

    }
    public void getUsers(){
        databaseReference.addValueEventListener(new ValueEventListener() {
            String userName, email, number;
            @Override
            public void onDataChange(@NonNull DataSnapshot snapshot) {
                for (DataSnapshot dataSnapshot: snapshot.getChildren()){
                    userName =dataSnapshot.child("userName").getValue().toString();
                    email = dataSnapshot.child("email").getValue().toString();
                    number = dataSnapshot.child("number").getValue().toString();
                    arrayList.add(new DBHelper(userName,email,number));;
                     }
                    list.setAdapter(new ListAdapter(arrayList,MainActivity.this));
            }

            @Override
            public void onCancelled(@NonNull DatabaseError error) {

            }
        });
    }
    @Override
    public void onBackPressed() {
        super.onBackPressed();
    }

    public static void cleanList(){
        arrayList.clear();
    }
}
activity_main.xml
- activity_main.xml consists of LinearLayout.
- orientation is used to set the orientation of the layout.
- gravity is used to set where the item or view will start from if we give it a value center it will start from the center.
- layout_widht is used the set width of the view example match_parent value is passed then the view will take the size of its parent view or if the view is parent view then it will take the size of the screen Same with the height.
- warp_content the view will take the size of content passed to the view.
- <Button/> view is used to create a Button view on the screen.
- id tag is used to access button view from button object in our main class and we can change button view attributes through the object.
- text tag is used to set the text of the button.
- background tag is used to assign design to view. The @drawable/btn value pass is the location of the btn file we assign to the Button view.
- marginButton is used to give space after button view.
- androidx.recyclerview.widget.RecyclerView is RecyclerView and we provide it with id.
<?xml version="1.0" encoding="utf-8"?>
<LinearLayout xmlns:android="http://schemas.android.com/apk/res/android"
    xmlns:app="http://schemas.android.com/apk/res-auto"
    xmlns:tools="http://schemas.android.com/tools"
    android:layout_width="match_parent"
    android:layout_height="match_parent"
    tools:context=".MainActivity"
    android:orientation="vertical"
    android:gravity="start"
    >

    <Button
        android:id="@+id/btn_CreateMain"
        android:layout_width="wrap_content"
        android:layout_height="wrap_content"
        android:text="@string/btn_Create"
        android:gravity="center"
        android:layout_gravity="center"
        android:background="@drawable/btn"
        android:layout_marginBottom="10dp"/>
    <androidx.recyclerview.widget.RecyclerView android:layout_height="match_parent"
        android:layout_width="match_parent" android:id="@+id/list"/>

</LinearLayout>
Step 2: Creating New Activity for Login and SignUp page
Right-click on the com.example.<app-name> and create a new empty activity with name SecondActivity.

SecondActivity.java
- Each of these activities is for a different Task
- SecondActivity is used for Inserting, Reading, and Updating data
- we are using if method to differentiate between different methods every time a user clicks on a button it sends them to a new activity with intent and key-value pair we are using a key Button for all button pairs but we are sending different values.
- by different values, we can differentiate between different buttons pressed
- EditText is used to make change EditText view by assigning EditText class object to EditText view by findViewById
- getIntent will Return the intent that started this activity. Through that, we can access the key Value pair passed to this class with the intent.
- getStringExtra method is used to get the pair by passing in the key and it will return a value.
- txtUsername is an object of EditText class and it’s been assigned to the EditText view in activity_second.xml.
- databaseReference.child(userName).setValue(DBHelper) will create a database table with table name as userName and then pass the value of DBHelper to table.
- Toast is a popup message
- Intent is used to jump to other activities with the context of this class to Reference Class.
- StartActivity is used to jump to another activity.
- We are creating hashMap which used key-value pair we are passing it to updateChildren method it will update the children of the column.
- we are also passing OnCompleteListener class which has an abstract method onComplete Which has a Value Task.
- task.inSuccessful method will return a true or false value if the task failed or was completed.
- In Read, if statement we are just getting the values from the intent, and the setText method is used to set text to edit text view.
- button.setText() will change the text of the button view.
package com.example.crud_firebase;
import androidx.annotation.NonNull;
import androidx.appcompat.app.AppCompatActivity;
import android.app.Activity;
import android.content.Intent;
import android.os.Bundle;
import android.view.View;
import android.widget.Button;
import android.widget.EditText;
import android.widget.Toast;
import com.example.crud_firebase.DBHelper.DBHelper;
import com.google.android.gms.tasks.OnCompleteListener;
import com.google.android.gms.tasks.Task;
import com.google.firebase.database.DataSnapshot;
import com.google.firebase.database.DatabaseError;
import com.google.firebase.database.DatabaseReference;
import com.google.firebase.database.FirebaseDatabase;
import com.google.firebase.database.ValueEventListener;
import java.util.HashMap;
public class SecondActivity extends AppCompatActivity {
private Intent i ;
private String s;
private EditText txtEmail,txtNumber,txtUsername;
private FirebaseDatabase firebaseDatabase;
private DatabaseReference databaseReference;
private String user="Users";
private String userName,email,number;
private Button button;
@Override
public void onBackPressed() {
Intent j = new Intent(SecondActivity.this,MainActivity.class);
startActivity(j);
finish();
super.onBackPressed();
}
@Override
protected void onCreate(Bundle savedInstanceState) {
super.onCreate(savedInstanceState);
setContentView(R.layout.activity_second);
button= findViewById(R.id.btnSubmit);
txtEmail = (EditText)findViewById(R.id.editTxtEmail);
txtNumber =(EditText)findViewById(R.id.editTxtNumber);
txtUsername =(EditText)findViewById(R.id.editTxtUsername);
firebaseDatabase =FirebaseDatabase.getInstance();
databaseReference =firebaseDatabase.getReference(user);
button.setText("Submit");
i = getIntent();
s=i.getStringExtra("Button");
if (s.equals("Create")){
button.setOnClickListener(new View.OnClickListener() {
@Override
public void onClick(View view) {
userName = txtUsername.getText().toString();
email= txtEmail.getText().toString();
number = txtNumber.getText().toString();
databaseReference.child(userName).setValue(new DBHelper(userName,email,number));
Toast.makeText(SecondActivity.this,"Data Inserted",Toast.LENGTH_SHORT).show();
i = new Intent(SecondActivity.this,MainActivity.class);
startActivity(i);
finish();
}
});
}else if (s.equals("Edit")){
String temp;
HashMap hashMap = new HashMap();
userName = i.getStringExtra("userName");
temp = userName;
email = i.getStringExtra("email");
number = i.getStringExtra("number");
txtUsername.setText(userName);
txtEmail.setText(email);
txtNumber.setText(number);
button.setOnClickListener(new View.OnClickListener() {
@Override
public void onClick(View v) {
userName = txtUsername.getText().toString();
email = txtEmail.getText().toString();
number = txtNumber.getText().toString();
hashMap.put("userName",userName);
hashMap.put("email",email);
hashMap.put("number",number);
databaseReference.child(temp).updateChildren(hashMap).addOnCompleteListener(new OnCompleteListener() {
@Override
public void onComplete(@NonNull Task task) {
i = new Intent(SecondActivity.this,MainActivity.class);
if (task.isSuccessful()){
Toast.makeText(SecondActivity.this,"Data Updated",Toast.LENGTH_SHORT).show();
}else {
Toast.makeText(SecondActivity.this,"Failed to update data",Toast.LENGTH_SHORT).show();
}
startActivity(i);
finish();
}
});
}
});
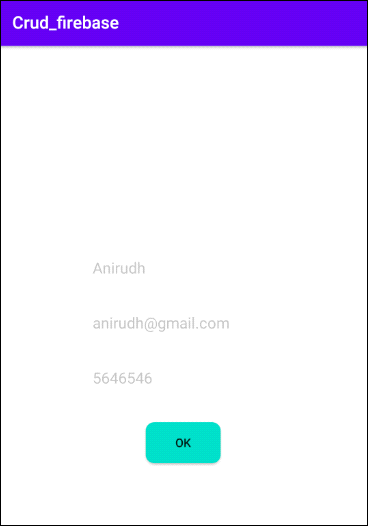
}else if (s.equals("Read")){
userName = i.getStringExtra("userName");
email = i.getStringExtra("email");
number = i.getStringExtra("number");
button.setText("OK");
txtUsername.setText(userName);
txtEmail.setText(email);
txtNumber.setText(number);
txtEmail.setEnabled(false);
txtNumber.setEnabled(false);
txtUsername.setEnabled(false);
button.setOnClickListener(new View.OnClickListener() {
@Override
public void onClick(View v) {
i = new Intent(SecondActivity.this,MainActivity.class);
startActivity(i);
finish();
}
});
}
}
}
activity_second.xml
<?xml version="1.0" encoding="utf-8"?>
<LinearLayout xmlns:android="http://schemas.android.com/apk/res/android"
    xmlns:app="http://schemas.android.com/apk/res-auto"
    xmlns:tools="http://schemas.android.com/tools"
    android:layout_width="match_parent"
    android:layout_height="match_parent"
    tools:context=".SecondActivity"
    android:divider="@drawable/spaceing"
    android:showDividers="middle"
    android:gravity="center"
    android:orientation="vertical">

    <EditText
        android:id="@+id/editTxtUsername"
        android:layout_width="wrap_content"
        android:layout_height="wrap_content"
        android:ems="10"
        android:background="@drawable/text"
        android:hint="User Name"
         />
    <EditText
        android:background="@drawable/text"
        android:id="@+id/editTxtEmail"
        android:layout_width="wrap_content"
        android:layout_height="wrap_content"
        android:ems="10"
        tools:layout_editor_absoluteX="101dp"
        tools:layout_editor_absoluteY="258dp"
        android:hint="Email"/>
    <EditText
        android:background="@drawable/text"
        android:id="@+id/editTxtNumber"
        android:layout_width="wrap_content"
        android:layout_height="wrap_content"
        android:ems="10"
        tools:layout_editor_absoluteX="101dp"
        tools:layout_editor_absoluteY="258dp"
        android:hint="Number"/>
    <Button
        android:background="@drawable/btn"
        android:id="@+id/btnSubmit"
        android:layout_width="wrap_content"
        android:layout_height="wrap_content"/>
</LinearLayout>
Create Activity

Read
Update

Step 3: Creating Adapter and DBHelper Class
- This Adapter class will be used to populate the Recycler view with user data as Card.
- Extend adapter class with RecyclerView.Adapter<OuterClass.InnerClass>.
- Extend inner class with RecyclerView.ViewHolder class.
- Now in the inner class, we use the constructor to assign objects to view.
- Override abstract method in ListAdapter class.
- onCreateViewHolder method is used to populate Recycler View which we Created in activity_main.xml with list_item.xml.
- LayoutInflater is used to inflate Recycler view with Card View.
- We pass an array to Recycler view and it gets populated with a card view for every entry of array.
- onBindViewHolder method is used to make changes to card view child nodes.
- getItemCount() method will return the size of array.
ListAdapter.java
package com.example.crud_firebase;

import android.content.Context;
import android.content.Intent;
import android.view.LayoutInflater;
import android.view.View;
import android.view.ViewGroup;
import android.widget.Button;
import android.widget.TextView;
import android.widget.Toast;
import androidx.annotation.NonNull;
import androidx.recyclerview.widget.RecyclerView;
import com.example.crud_firebase.DBHelper.DBHelper;
import com.google.android.gms.tasks.OnCompleteListener;
import com.google.android.gms.tasks.Task;
import com.google.firebase.database.DatabaseReference;
import com.google.firebase.database.FirebaseDatabase;

import java.util.ArrayList;

public class ListAdapter extends RecyclerView.Adapter<ListAdapter.ListHolder> {
    private ArrayList<DBHelper> arrayList;
    private Context context;
    private DBHelper dbHelper;
    private FirebaseDatabase firebaseDatabase;
    private DatabaseReference databaseReference;

    public ListAdapter(ArrayList<DBHelper> arrayList,Context  context) {
        this.arrayList = arrayList;
        this.context= context;
    }
    @NonNull
    @Override
    public ListHolder onCreateViewHolder(@NonNull ViewGroup parent, int viewType) {
        LayoutInflater inflater = LayoutInflater.from(parent.getContext());
        View view = inflater.inflate(R.layout.list_items,parent,false);
        return new ListHolder(view);
    }

    @Override
    public void onBindViewHolder(@NonNull ListHolder holder, int position) {
    Intent i = new Intent(context, SecondActivity.class);
    String s1 = arrayList.get(position).getUserName();
    holder.textList.setText(s1);
    holder.editList_items.setOnClickListener(new View.OnClickListener() {
        @Override
        public void onClick(View v) {
            dbHelper = arrayList.get(position);
            i.putExtra("Button","Edit");
            i.putExtra("userName",dbHelper.getUserName());
            i.putExtra("email",dbHelper.getEmail());
            i.putExtra("number",dbHelper.getNumber());
            context.startActivity(i);
            MainActivity.Fa.finish();
        }
    });

    holder.readList_item.setOnClickListener(new View.OnClickListener() {
        @Override
        public void onClick(View v) {
            dbHelper = arrayList.get(position);
            i.putExtra("Button","Read");
            i.putExtra("userName",dbHelper.getUserName());
            i.putExtra("email",dbHelper.getEmail());
            i.putExtra("number",dbHelper.getNumber());
            context.startActivity(i);
            MainActivity.Fa.finish();
        }
    });
        holder.deleteList_items.setOnClickListener(new View.OnClickListener() {
            @Override
            public void onClick(View v) {
                dbHelper = arrayList.get(position);
                firebaseDatabase = FirebaseDatabase.getInstance();
                databaseReference =firebaseDatabase.getReference("Users");
                String temp =dbHelper.getUserName();
                databaseReference.child(temp).removeValue().addOnCompleteListener(new OnCompleteListener<Void>() {
                    @Override
                    public void onComplete(@NonNull Task<Void> task) {
                        if (task.isSuccessful()){
                            Toast.makeText(context,"Data Removed",Toast.LENGTH_SHORT).show();
                        }else {
                            Toast.makeText(context,"Failed to remove data",Toast.LENGTH_SHORT).show();
                        }
                    }
                });
                MainActivity.cleanList();
            }
        });
    }

    @Override
    public int getItemCount() {
        return arrayList.size();
    }


    public class ListHolder extends RecyclerView.ViewHolder{
        private TextView textList;
        private Button editList_items,deleteList_items,readList_item;
        public ListHolder(@NonNull View itemView ) {
            super(itemView);
            textList =(TextView) itemView.findViewById(R.id.textItem);
            editList_items =(Button) itemView.findViewById(R.id.editList_items);
            deleteList_items = (Button) itemView.findViewById(R.id.deleteList_items);
            readList_item = (Button) itemView.findViewById(R.id.readList_items);
        }

    }
}
DBHelper.class
- Here we are using wrapper class to insert data into firebase with the help of the DBHelper constructor.
- The DBHelper get method is used to return the String value.
package com.example.crud_firebase.DBHelper;

public class DBHelper {
    private String userName;
    private String email;
    private String number;

    public DBHelper(String userName, String email, String number) {
        this.userName = userName;
        this.email = email;
        this.number = number;
    }

    public String getUserName() {
        return userName;
    }

    public String getEmail() {
        return email;
    }

    public String getNumber() {
        return number;
    }
}
Step 3.1:Create CardView.xml for RecyclerView

list_items.xml
<?xml version="1.0" encoding="utf-8"?>
<LinearLayout
    xmlns:android="http://schemas.android.com/apk/res/android" android:layout_width="match_parent"
    android:layout_height="wrap_content"
    android:orientation="horizontal"
    android:divider="@drawable/spaceing"
    android:showDividers="middle"
    android:paddingBottom="20dp"
    android:gravity="center"

    >
    <androidx.cardview.widget.CardView
        android:layout_width="match_parent"
        android:layout_height="match_parent"
        android:elevation="10dp"

        >
        <LinearLayout
            xmlns:android="http://schemas.android.com/apk/res/android" android:layout_width="match_parent"
            android:layout_height="match_parent"
            android:orientation="horizontal"
            android:divider="@drawable/spaceing"
            android:showDividers="middle"
            android:paddingBottom="20dp"

            android:gravity="center"

            >
            <TextView
                android:layout_width="wrap_content"
                android:layout_height="wrap_content"
                android:id="@+id/textItem"
                android:paddingLeft="20dp"
                android:textSize="20dp"
                android:paddingRight="10dp"
                android:layout_marginLeft="10dp"
                android:layout_weight="3"
                android:background="@drawable/text"
                android:textColor="#000000"
                />
            <LinearLayout
                android:layout_width="wrap_content"
                android:layout_height="match_parent"
                android:orientation="horizontal"
                android:layout_weight="1"
                android:gravity="center"
                android:layout_gravity="center"
                >
                <Button
                    android:id="@+id/editList_items"
                    android:layout_width="wrap_content"
                    android:layout_height="wrap_content"
                    android:background="@drawable/btn"
                    android:paddingRight="10dp"
                    android:text="Edit"
                    />

                <Button
                    android:background="@drawable/btn"
                    android:id="@+id/deleteList_items"
                    android:layout_width="wrap_content"
                    android:layout_height="wrap_content"
                    android:paddingRight="10dp"
                    android:text="Delete"
                    android:layout_marginLeft="10dp"/>

                <Button
                    android:background="@drawable/btn"
                    android:id="@+id/readList_items"
                    android:layout_width="wrap_content"
                    android:layout_height="wrap_content"
                    android:paddingRight="10dp"
                    android:text="Read"
                    android:layout_marginLeft="10dp"/>
            </LinearLayout>

        </LinearLayout>

    </androidx.cardview.widget.CardView>
</LinearLayout>
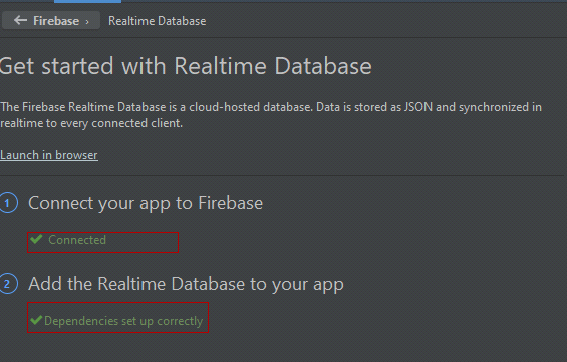
Step 4: Setting Up Firebase
- First, we Have to connect Firebase to our Android Studio so make sure you Signed in with your Google Id
- Go to https://firebase.google.com sign in and click on Get Started.
- Click on add project.

- Enter your database name and press continue.

- Press Continue again
- Select Your Account and Press Create Account
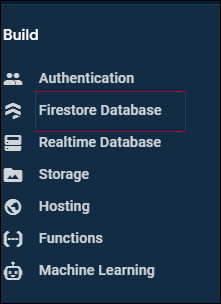
- Click Real-Time database.
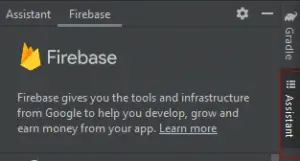
- Now go to Android Studio.
- Goto Tool -> Firebase.

- Open Firebase Assistant
- Click on Realtime Database and then on Get Started.
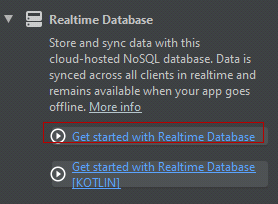
- Click on Connect and then click on add the Realtime Database to your App.
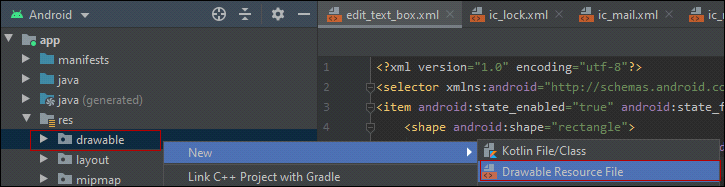
Step 4: Creating Resource Files
Go to app -> res -> drawable and create these files.
Background_main.xml
- gradient is used to mix colors
- corners tag is used to curve the view
- if it is a rectangle giving it 10dp it will be more like ovel.
- Shape tag is used to give shape to view.
<?xml version="1.0" encoding="utf-8"?>
<selector xmlns:android="http://schemas.android.com/apk/res/android">
    <item android:state_enabled="true">
        <shape android:shape="rectangle">
            <corners android:radius="10dp"/>
            <solid android:color="#808080"/>
        </shape>
    </item>
</selector>
Btn.xml
<?xml version="1.0" encoding="utf-8"?>
<selector xmlns:android="http://schemas.android.com/apk/res/android">
    <item android:state_enabled="true">
        <shape android:shape="rectangle">
            <corners android:radius="10dp"/>
            <solid android:color="@color/colorAccent"/>
        </shape>
    </item>
</selector>
spaceing.xml
<?xml version="1.0" encoding="utf-8"?>
<selector xmlns:android="http://schemas.android.com/apk/res/android">
<item>
    <shape >
        <size android:width="0dp"
            android:height="40dp"/>
    </shape>
</item>
</selector>
text.xml
<?xml version="1.0" encoding="utf-8"?>
<selector xmlns:android="http://schemas.android.com/apk/res/android">
    <item android:state_enabled="true" android:state_focused="true">
        <shape android:shape="rectangle">
            <solid android:color="@color/colorAccent"/>
            <corners android:radius="10dp"/>
        </shape>
    </item>
</selector>
In this way, we perform CRUD operations in android using the Firebase database.
Android practice tasks
https://codebun.com/login-and-registration-in-android-and-sqlite/
https://codebun.com/login-and-registration-in-android-using-firebase/
https://codebun.com/dynamic-and-static-dropdown-menuspinner-in-android/
https://codebun.com/crud-operation-using-sqlite-in-android/
https://codebun.com/how-to-get-data-from-api-in-android/
https://codebun.com/how-to-create-custom-alert-dialog-in-android/
https://codebun.com/search-and-sort-records-in-android-with-recycler-view/
https://codebun.com/create-a-custom-notification-with-custom-message-in-android/
