In this C# tutorial, Create a login and registration form in C# with the MYSQL database. where the user can run the application, register a new user, and log in with the same user name and password and the data will be stored into MySQL database using the user table.
What is the registration form & why do we use them?
A registration form is a list of input fields to get the user information and a submit button to save the data into the database. There are many reasons why you would want a person to fill out a registration form. Companies use registration forms to sign up customers for subscriptions, services, or other programs or plans.
Prerequisites
To follow this article along it would be helpful to have the following:
- An editor, in my case, I’ll be using Visual Studio.
- Some basic C# and SQL knowledge.
- Knowledge on how to run relational database management in this case, we will use MySQL.
- Visual Studio knowledge and how to create projects.
Create Login & Registration form in C# with MYSQL
Create a simple C# windows application with a registration form with the fields Name, Username, and Password and a login form with the fields Username and Password.
Create Database using MYSQL Workbench
Create database userdata;

// Create Table
CREATE TABLE `user_info`
 ( `id` INT NOT NULL AUTO_INCREMENT ,
 `names` VARCHAR(50) NOT NULL ,
 `username` VARCHAR(20) NOT NULL ,
`password` VARCHAR(50) NOT NULL ,
 PRIMARY KEY (`id`)) ;
Create a new C# Project in Visual Studio
- Create a Visual Studio project by clicking on File -> New -> Project and then select Visual C#.
- From the window, choose Windows Forms App(.Net Framework).
- Give your application a name.
- Then click ok.
- The project will come with a default form called Form 1.
Create a config class to execute MySQL queries
Since C# is object-oriented, we will create a class that will handle the execution of queries that we will use in our program.
- From the Solution Explorer window right-click and select add -> New Item -> Class. Name the class Config.cs the click on the button add.
- Add MySQL.Data Library by right-clicking on solution explorer window, then Manage Nugget packages, then search for MySQL.Data Library and install MYSQL LIBRARY.
- Add the required classes to help in the execution of MySQL queries in Config.cs.
- Now that we have Config.cs, we can execute any MySQL statement.
Config.cs
using System;
using System.Collections.Generic;
using System.Linq;
using System.Text;
using System.Threading.Tasks;
using MySql.Data.MySqlClient;
//add this for MessageBox
using System.Windows.Forms;

// add data function classes
using System.Data;

namespace LoginSystem
{
    public class Config
    {
        string ConectionString = "";  // save connection string
        public MySqlConnection connection = null;
        public string server = "127.0.0.1";// MySQL host / ip of the computer
        public string user = "root";// MySQL user
        public string password = "";// MySQL password
        DataSet ds;
        DataTable dt;
        public string Table = "user_info"; // initialize db table
        public string ConnectionType = "";
        string RecordSource = "";

        DataGridView tempdata;

        public Config()
        {

        }

        // function to connect to the database
        public void Connect(string database_name)
        {
            try
            {

                   ConectionString = "SERVER=" + server + ";" + "DATABASE=" + database_name + ";" + "UID=" + user + ";" + "PASSWORD=" + password + ";";

                connection = new MySqlConnection(ConectionString);
            }
            catch (Exception E)
            {
                MessageBox.Show(E.Message);
            }
        }

        // Function to execute select statements
        public void ExecuteSql(string Sql_command)
        {

            nowquiee(Sql_command);

        }

        // creates connection to MySQL before execution
        public void nowquiee(string sql_comm)
        {
            try
            {
                MySqlConnection cs = new MySqlConnection(ConectionString);
                cs.Open();
                MySqlCommand myc = new MySqlCommand(sql_comm, cs);
                myc.ExecuteNonQuery();
                cs.Close();


            }
            catch (Exception err)
            {

                MessageBox.Show(err.Message);
            }
        }

        // function to execute delete , insert and update
        public void Execute(string Sql_command)
        {
            RecordSource = Sql_command;
            ConnectionType = Table;
            dt = new DataTable(ConnectionType);
            try
            {
                string command = RecordSource.ToUpper();

                //======================if sql contains select==========================================
                MySqlDataAdapter da2 = new MySqlDataAdapter(RecordSource, connection);

                DataSet tempds = new DataSet();
                da2.Fill(tempds, ConnectionType);
                da2.Fill(tempds);

                //======================================================================================


            }
            catch (Exception err) { MessageBox.Show(err.Message); }
        }

        // function to bring selected results based on column name and row index
        public string Results(int ROW, string COLUMN_NAME)
        {
            try
            {
                return dt.Rows[ROW][COLUMN_NAME].ToString();
            }
            catch (Exception err)
            {
                MessageBox.Show(err.Message);
                return "";

            }
        }

        // function to bring selected results based on column index and row index
        public string Results(int ROW, int COLUMN_NAME)
        {
            try
            {
                return dt.Rows[ROW][COLUMN_NAME].ToString();
            }
            catch (Exception err)
            {
                MessageBox.Show(err.Message);
                return dt.Rows[ROW][COLUMN_NAME].ToString();

            }
        }

        // Execute select statement
        public void ExecuteSelect(string Sql_command)
        {
            RecordSource = Sql_command;
            ConnectionType = Table;

            dt = new DataTable(ConnectionType);
            try
            {
                string command = RecordSource.ToUpper();
                MySqlDataAdapter da = new MySqlDataAdapter(RecordSource, connection);
                ds = new DataSet();
                da.Fill(ds, ConnectionType);
                da.Fill(dt);
                tempdata = new DataGridView();
            }
            catch (Exception err)
            {
                MessageBox.Show(err.Message);
            }


        }

        // count Number of rows after select
        public int Count()
        {
            return dt.Rows.Count;
        }
    }
}
Create Login & Register windows form in C#
In Microsoft Visual Studio, create a new project. Choose project -> Add Windows Form from File submenu in the left corner, give the form a name Register, and click Add.
We have two Windows form classes that is Form1.cs and Register.cs.
Form1
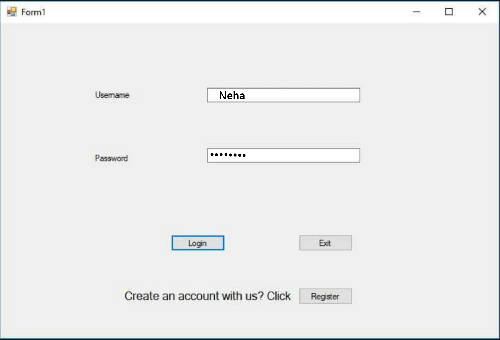
Click on Form1.cs in Solution Explorer, and on the form that displays, add three buttons, two text boxes, and two labels.
- The first button will be the register button, which launches the Register form.
- The second button will be the Login button that will open the login form.
- When the user will enter the valid inputs in the fields and click on submit form button, the request will create a connection with MYSQL to save the data at the time of registration and verify the user at the time of login.
- The labels will indicate the functionality of the two text boxes.

Register form
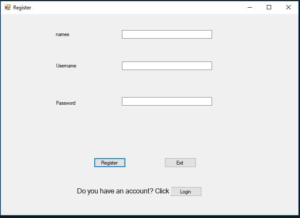
Click on Register.cs in the Solution Explorer and on the form that displays add two buttons, three text boxes, and three labels.
- The first button will be a register button to save input data, and the second one will be an exit button that will close the Register form.
- The first text box will allow the input of the name of the user. The second text box will allow input of the user’s username. The third text box is for entering the password.
- The labels will show the functionality of the three text boxes.
Form1.cs
using System;
using System.Collections.Generic;
using System.ComponentModel;
using System.Data;
using System.Drawing;
using System.Linq;
using System.Text;
using System.Threading.Tasks;
using System.Windows.Forms;

namespace LoginSystem
{
    public partial class Form1 : Form
    {

        // Initialize the connection class
        Config db = new Config();
        public Form1()
        {
            InitializeComponent();

            // pass the database you want to connect to
            db.Connect("userdata");
        }

        private void button1_Click(object sender, EventArgs e)
        {
            // query MySQL database for the data passed from text boxes
            db.ExecuteSelect("SELECT * FROM `user_info` where username='" + textBox1.Text+ "' and password ='" + textBox2.Text+"'");

            if (db.Count() == 1)
            {
                MessageBox.Show("Success You will Login as"+db.Results(0, "names"));
            }
            else
            {
                MessageBox.Show("Wrong username and password combination" );
            }

        }

        private void button2_Click(object sender, EventArgs e)
        {
            // start register window
            Register register = new Register();

            register.Show();
        }

        private void button3_Click(object sender, EventArgs e)
        {

            // closes the application
            Environment.Exit(0);
        }
    }
}
Initialize the Config file in Register.cs to allow us to access the database with ease.
Register.cs
Config db = new Config();
        public Register()
        {
            InitializeComponent();
            // pass the database you want to connect to
            db.Connect("userdata");
        }

private void button3_Click(object sender, EventArgs e)
{
// closes the register window
  this.Close();
  }

private void button2_Click(object sender, EventArgs e)
{
// saves data in the database
db.Execute("INSERT INTO `user_info` (`id`, `names`, `username`, `password`) VALUES (NULL, '"+textBox3.Text+"', '"+textBox1.Text+"', '"+textBox2.Text+"');");
 this.Close();
  }
Now we have successfully created a simple registration form using C#. Now, run the application, enter data, and click on the REGISTER button.
Example:

In this way, we learn How to create a simple registration and login form in C#.
