How to create a Pagination in React JS with Spring Boot Application? In this article, we will learn How to create a Pagination in React JS with Spring Boot Application.
Tools and Technologies Used in Spring boot and ReactJs app
- React JS
- Spring Boot
- MYSQL Database
- Spring Data JPA
Pagination using React JS and Spring Boot with MYSQL
We will develop a simple application where we will fetch the list of Books from the database on the web page using React JS as a front-end technology and Spring Boot as a Backend technology.
Here, we will perform pagination on the data and will display a large set of data in chunks. If you want to know more about Spring Boot check this article https://codedec.com/course/spring-boot/.
Let us divide the development process into two parts:
- Frontend: React JS
- Backend: Spring Boot
Note: If you want to know How to display only the list on the web page using React JS and Spring Boot application check this article https://codebun.com/how-to-create-spring-boot-and-reactjs-application/.
Create Backend Part using Spring boot, Spring Data JPA and MYSQL
Create a Database
The first step is to create a database name ‘db_demo’ using the MYSQL command line or Workbench.
Create database db_demo
Create Project
Create a project using Spring Initializr. If you don’t know how to create a project using the same check this article https://codedec.com/tutorials/how-to-create-spring-boot-project-using-spring-initializr/

Import a Project
Now, it’s time to import the project into STS. Go to File > Import > Maven > Existing Maven Project > Next > Browse > Select the project > Finish. Now it will take time to import the project and will import all the dependencies in case you added.
Configure application. properties file
# change the port
server.port=8888
#Database Configrations
spring.datasource.url=jdbc:mysql://localhost:3306/db_demo
spring.datasource.driver-class-name=com.mysql.cj.jdbc.Driver
spring.datasource.username=root
spring.datasource.password=root
spring.jpa.database-platform = org.hibernate.dialect.MySQL8Dialect
spring.jpa.generate-ddl=true
spring.jpa.hibernate.ddl-auto = update
Create a Model Class
Here, we will create a Model class called Book.java. I have used the Lombok library to remove boilerplate code. In case you want to know what is Lombok check this article https://codedec.com/tutorials/how-to-configure-lombok-into-eclipse/
Book.java
package com.abc.in.model;

import javax.persistence.Entity;
import javax.persistence.GeneratedValue;
import javax.persistence.GenerationType;
import javax.persistence.Id;
import javax.persistence.Table;

import org.springframework.context.annotation.EnableAspectJAutoProxy;

import lombok.AllArgsConstructor;
import lombok.Getter;
import lombok.NoArgsConstructor;
import lombok.Setter;

@Setter
@Getter
@AllArgsConstructor
@NoArgsConstructor
@Entity
@Table(name = "book")
public class Book {

 @Id
 @GeneratedValue(strategy = GenerationType.AUTO)
 private long id;

 private String bookName;

 private String authorName;

 private long price;
}
Create Repository Interface
Now, we will create a Data Access Layer called BookRepository which will extend JPARepository. If you want to know How to add dynamic pagination using Spring Data JPA check this article Pagination.
package com.abc.in.repository;
import org.springframework.data.jpa.repository.JpaRepository;
import com.abc.in.model.Book;
public interface BookRepository extends JpaRepository<Book, Long>{
}
Create a Controller
The client request is sent to the controller which acts as an API layer that will have the endpoints for REST API.
package com.abc.in.controller;

import java.util.List;

import org.springframework.beans.factory.annotation.Autowired;
import org.springframework.data.domain.Page;
import org.springframework.data.domain.Pageable;
import org.springframework.http.HttpStatus;
import org.springframework.http.ResponseEntity;
import org.springframework.web.bind.annotation.CrossOrigin;
import org.springframework.web.bind.annotation.GetMapping;
import org.springframework.web.bind.annotation.PathVariable;
import org.springframework.web.bind.annotation.PostMapping;
import org.springframework.web.bind.annotation.RequestBody;
import org.springframework.web.bind.annotation.RestController;

import com.abc.in.model.Book;
import com.abc.in.repository.BookRepository;
@CrossOrigin(origins = "http://localhost:3000/")
@RestController
public class BookController {

 @Autowired
 private BookRepository bookRepository;
 @GetMapping("/books")
 public Page<Book> getAllBooks(Pageable pageable) {
  return bookRepository.findAll(pageable);
 }
}
- Mark this class as @RestController(It is used to simplify the creation of REST APIs).
- Here, we have a repository method findAll(Pageable pageable) that will return the Page object. Thus, this page object will return the list.
Now, Here you can add multiple records directly into a table using MYSQL workbench or you can implement the CommandLineRunner interface as shown below.
package com.abc.in;

import org.springframework.beans.factory.annotation.Autowired;
import org.springframework.boot.CommandLineRunner;
import org.springframework.boot.SpringApplication;
import org.springframework.boot.autoconfigure.SpringBootApplication;

import com.abc.in.model.Book;
import com.abc.in.repository.BookRepository;

@SpringBootApplication
public class SpringBootBackendPartApplication implements CommandLineRunner {

 public static void main(String[] args) {
  SpringApplication.run(SpringBootBackendPartApplication.class, args);
 }

 @Autowired
 private BookRepository bookRepository;

 @Override
 public void run(String... args) throws Exception {
  Book book = new Book();

  for (int i = 0; i < 30; i++) {
   bookRepository.save(new Book(1, "Wings of Fire", "A P J Abdul Kalam, Arun Tiwari", 500 + i));
   bookRepository.save(new Book(2, "The Alchemist", "Paulo Coelho", 144 + i));
   bookRepository.save(new Book(3, "War and Peace", "Leo Tolstoy", 299 + i));
   bookRepository.save(new Book(3, "Song of Solomon", "Tony Morrison", 555 + i));
  }
 }
}
Run the Application
Run the above class and see the data would now be persisted into the table. Go to the browser and hit the URL http://localhost:8888/books?page=0&size=5 and you will see the response in JSON format along with some more data such as Pagination data.
Create Frontend Part using ReactJS
Now, we will create a frontend part of the application using React JS. Open Cmd prompt > Go to the folder where you want to create a project with the help of command prompt codes > enter the command npx create-react-app book-frontend.
- Now, open Visual Studio Code IDE and open the book-frontend app.
- Here, you will see all the required folders and files.
We will be using bootstrap in React JS. So, open the terminal of VS code and type the following command
D:\Job Stuff\My_Study\React JS\book-frontend>npm install bootstrap
You have to install React Bootstrap also by using the following command
D:\Job Stuff\My_Study\React JS\book-frontend> npm install react-bootstrap
Install Axios library that is going to make a request to the endpoints which we have created at the backend.
D:\Job Stuff\My_Study\React JS\book-frontend> npm install axios
Create BookComponent.js
Inside the src folder, create a components folder and add a BookComponent.js and add the following lines of code.
import axios from 'axios';
import React from 'react'
import { Button, Row } from 'react-bootstrap';
import { Link } from 'react-router-dom';
import bookService from '../services/BookService'


class BookComponent extends React.Component{

    constructor(props){
        super(props)
        this.state ={
            books:[],
            currentPage:1,
            recordPerPage:7,
        }
    }

    componentDidMount(){
        this.getBooksByPagination(this.state.currentPage);
    }
    getBooksByPagination(currentPage){
            currentPage=currentPage-1;
        axios.get("http://localhost:8888/books?page="+currentPage+"&size="+this.state.recordPerPage)
        .then(response => response.data).then((data) =>{
             this.setState({books:data.content,
                totalPages:data.totalPages,
                totalElements: data.totalElements,
                currentPage: data.number+1
            });
           });
    }

    //Writing All the pagination functions
    //Show Next page
    showNextPage = () =>{
        if(this.state.currentPage < Math.ceil(this.state.totalElements/this.state.recordPerPage)){
            this.getBooksByPagination(this.state.currentPage + 1);
        }
    };

    //Show Last Page
    showLastPage = () =>{
        if(this.state.currentPage < Math.ceil(this.state.totalElements/this.state.recordPerPage)){
            this.getBooksByPagination(Math.ceil(this.state.totalElements/this.state.recordPerPage));
        }
    };
    //Show First page
    showFirstPage = ()=>{
        let firstPage = 1;
        if(this.state.currentPage > firstPage){
            this.getBooksByPagination(firstPage);
        }
    };

    //Show previous page
    showPrevPage = () =>{
        let prevPage = 1
        if(this.state.currentPage > prevPage){
            this.getBooksByPagination(this.state.currentPage - prevPage);
        }
    };

    render(){
        const {books, currentPage, totalPages,recordPerPage} = this.state;
        return(
        <div>

            <h1 className="text-center mt-5 ">List of Books</h1>
            <div className="container mt-2">
            <table className="table table-bordered border-info shadow">
                <thead>
                    <tr>
                    <th>#</th>
                    <th>Book Name</th>
                    <th>Book Author</th>
                    <th>Price</th>
                    </tr>
                </thead>
                <tbody>
                    {books.length===0?
                        <tr align="center"><td colSpan="5">No Record Found</td></tr>:
                        books.map(
                            (books,index) =>(

                                <tr key = {books.id}>
                                        <td>{(recordPerPage*(currentPage-1))+index+1}</td>
                                        <td>{books.bookName}</td>
                                        <td>{books.authorName}</td>
                                        <td>{books.price}</td>

                                </tr>
                            )
                        )
                    }
                </tbody>

            </table>
            <table className="table">
                <div style={{float:'left',fontFamily: 'monospace',color: '#0275d8'}}>
                    Page {currentPage} of {totalPages}
                </div>
                <div style={{float:'right'}}>
                <div class="clearfix"></div>
                <nav aria-label="Page navigation example">
  <ul class="pagination">
    <li class="page-item"><a type="button" class="page-link"  disabled={currentPage===1?true:false} onClick={this.showPrevPage}>Previous</a></li>
    <li class="page-item"><a type="button" class="page-link"  disabled={currentPage===1?true:false } onClick={this.showFirstPage}>First</a></li>
    <li class="page-item"><a type="button" class="page-link"  disabled={currentPage===totalPages?true:false } onClick={this.showNextPage}>Next</a></li>
    <li class="page-item"><a type="button" class="page-link"  disabled={currentPage===totalPages?true:false} onClick={this.showLastPage}>Last</a></li>
  </ul>
</nav>
                </div>
            </table>
            </div>
        </div>
        )
    }
}
export default BookComponent
Now, let us divide the code and understand the working of it. First, add a constructor with props to pass data and use the state to manage the data as shown below. Here, set the currentPage and recordPerPage value to 1 and 7.
constructor(props){
        super(props)
        this.state ={
            books:[],
            currentPage:1,
            recordPerPage:7,
        }
    }
Now, add the componentDidMount() method which will be called after a component is mounted. Inside this method call the getBooksByPagination.
componentDidMount(){
        this.getBooksByPagination(this.state.currentPage);
   }
Now, define getBooksByPaginatination method. Inside this method, use the Axios library to make the request to the endpoints and set the state with the response data.
getBooksByPagination(currentPage){
            currentPage=currentPage-1;
        axios.get("http://localhost:8888/books?page="+currentPage+"&size="+this.state.recordPerPage)
        .then(response => response.data).then((data) =>{
             this.setState({books:data.content,
                totalPages:data.totalPages,
                totalElements: data.totalElements,
                currentPage: data.number+1
            });
           });
    }
Now, create all the Pagination functions such as showNextPage(), showPrevPage() and so on that would be called on the Next, Previous button/link.
//Writing All the pagination functions
    //Show Next page
    showNextPage = () =>{
        if(this.state.currentPage < Math.ceil(this.state.totalElements/this.state.recordPerPage)){
            this.getBooksByPagination(this.state.currentPage + 1);
        }
    };

    //Show Last Page
    showLastPage = () =>{
        if(this.state.currentPage < Math.ceil(this.state.totalElements/this.state.recordPerPage)){
            this.getBooksByPagination(Math.ceil(this.state.totalElements/this.state.recordPerPage));
        }
    };
    //Show First page
    showFirstPage = ()=>{
        let firstPage = 1;
        if(this.state.currentPage > firstPage){
            this.getBooksByPagination(firstPage);
        }
    };

    //Show previous page
    showPrevPage = () =>{
        let prevPage = 1
        if(this.state.currentPage > prevPage){
            this.getBooksByPagination(this.state.currentPage - prevPage);
        }
    };
At last, the render() method would return the view that would be rendered by the browser. Here, we create a table to show the list as well as the Pagination table also. we have used the map() function to iterate over the list.
render(){
        const {books, currentPage, totalPages,recordPerPage} = this.state;
        return(
        <div>

            <h1 className="text-center mt-5 ">List of Books</h1>
            <div className="container mt-2">
            <table className="table table-bordered border-info shadow">
                <thead>
                    <tr>
                    <th>#</th>
                    <th>Book Name</th>
                    <th>Book Author</th>
                    <th>Price</th>
                    </tr>
                </thead>
                <tbody>
                    {books.length===0?
                        <tr align="center"><td colSpan="5">No Record Found</td></tr>:
                        books.map(
                            (books,index) =>(

                                <tr key = {books.id}>
                                        <td>{(recordPerPage*(currentPage-1))+index+1}</td>
                                        <td>{books.bookName}</td>
                                        <td>{books.authorName}</td>
                                        <td>{books.price}</td>

                                </tr>
                            )
                        )
                    }
                </tbody>

            </table>
            <table className="table">
                <div style={{float:'left',fontFamily: 'monospace',color: '#0275d8'}}>
                    Page {currentPage} of {totalPages}
                </div>
                <div style={{float:'right'}}>
                <div class="clearfix"></div>
                <nav aria-label="Page navigation example">
  <ul class="pagination">
    <li class="page-item"><a type="button" class="page-link"  disabled={currentPage===1?true:false} onClick={this.showPrevPage}>Previous</a></li>
    <li class="page-item"><a type="button" class="page-link"  disabled={currentPage===1?true:false } onClick={this.showFirstPage}>First</a></li>
    <li class="page-item"><a type="button" class="page-link"  disabled={currentPage===totalPages?true:false } onClick={this.showNextPage}>Next</a></li>
    <li class="page-item"><a type="button" class="page-link"  disabled={currentPage===totalPages?true:false} onClick={this.showLastPage}>Last</a></li>
  </ul>
</nav>
                </div>
            </table>
            </div>
        </div>
        )
Here, to display serial numbers in increment order, we have used the following lines of code
<td>{(recordPerPage*(currentPage-1))+index+1}</td>
Now, add the BookComponent.js into App.js
import logo from './logo.svg';
import './App.css';
import BookComponent from './components/BookComponent';
function App() {
  return (
    <div className="App">
      <BookComponent/>
    </div>
  );
}
export default App;
Run the React JS app by going to the terminal and enter the following command
D:\Job Stuff\My_Study\React JS\book-frontend> npm start
At localhost:3001 you will be able to see the following output:
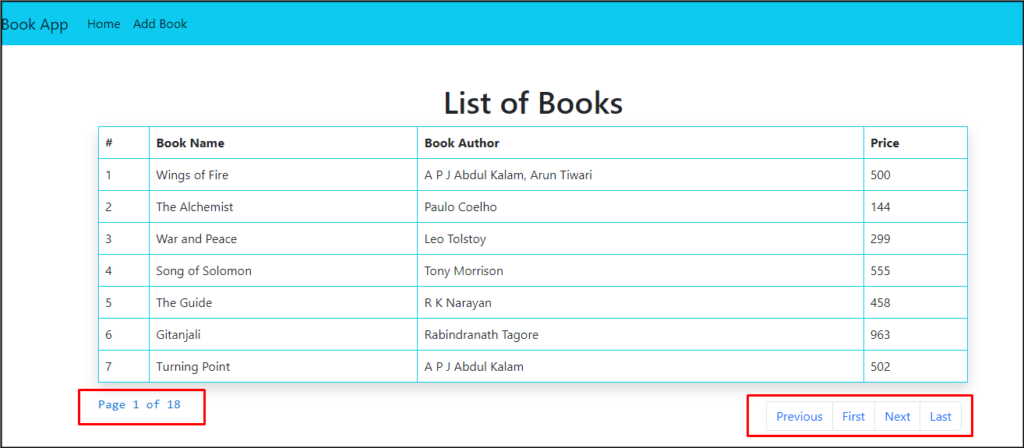

In this way, we learned how to apply dynamic pagination in React JS with the Spring boot application.
ReactJs and Spring boot Application examples
https://codebun.com/how-to-insert-data-into-mysql-using-react-js-and-spring-boot/
https://codebun.com/edit-and-update-records-in-react-js-using-spring-boot-and-mysql/
https://codebun.com/delete-record-from-a-table-in-react-js-spring-boot-and-mysql/
https://codebun.com/search-record-from-a-table-in-react-js-spring-boot-and-mysql/
https://codebun.com/how-to-create-a-pagination-in-react-js-and-spring-boot/
https://codebun.com/how-to-create-spring-boot-and-reactjs-application/
