How to create Alert Dialog in Android. In this article, we will learn How to create Alert Dialog in the Android application. In this android tutorial, let’s create a simple android application to build Custom AlertDialog to add items to ListView and Display on the home Activity.
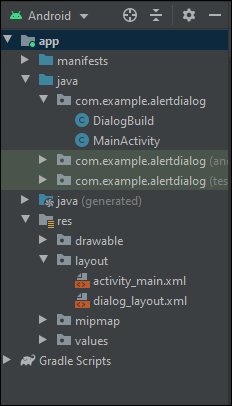
Android Project Structure
How to Create custom Alert Dialog in Android
Design a custom alert dialog in android. In the below android application example, We will create a simple android application to Add List items using Alert Dialog and display them in the list view.
Step 1: Create a new project with Empty Activity
- First, we create an object of all the views in the activity_main.xml file.
- Button object is used to connect to ButtonView of XML file, we used findViewById to assign button object to ButtonView.
- ListView object will be assigned to List in an XML file, these objects are used to make changes to view.
- You can use this adapter to provide views for an AdapterView, Returns a view for each object in a collection of data objects you provide.
- getArrayAdapter is a getter we will be using this getter to notify the adapter for data change whenever we add a new item to the list.
- DialogBuild is an object of our other class which we are using to create custom dialog
- R.id.btnAlert is the id of Button view in our XML file
- In ArrayAdapter we are passing the value where “this” is the context, followed by the style of list view and then the list of items
- setAdapter method is used to assign adapted to List View
- setOnClickListener method will be triggered when the user clicks on the button and the following statement will be executed
- we are calling openDialog method, in that method, we are calling dialogBuild.show which will display the dialog in the activity.
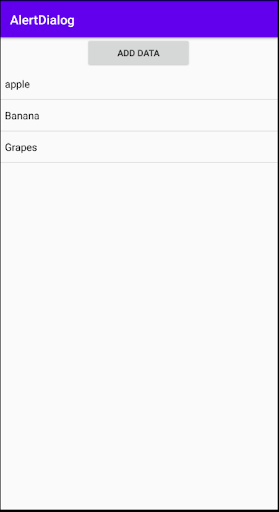
- When we click on the button it will display a dialog.

MainActivity.java
package com.example.alertdialog;

import androidx.appcompat.app.AppCompatActivity;
import android.os.Bundle;
import android.view.View;
import android.widget.ArrayAdapter;
import android.widget.Button;
import android.widget.ListView;

public class MainActivity extends AppCompatActivity {
    private Button btnAlert;
    private ListView listView;
    private static ArrayAdapter<String> arrayAdapter;

    public ArrayAdapter<String> getArrayAdapter() {
        return arrayAdapter;
    }

    private DialogBuild dialogBuild = new DialogBuild();
    @Override
    protected void onCreate(Bundle savedInstanceState) {
        super.onCreate(savedInstanceState);
        setContentView(R.layout.activity_main);
        btnAlert = findViewById(R.id.btnAlert);
        listView = findViewById(R.id.listView);
        arrayAdapter = new ArrayAdapter<>(this,R.layout.support_simple_spinner_dropdown_item,dialogBuild.getList());
        listView.setAdapter(arrayAdapter);
        btnAlert.setOnClickListener(new View.OnClickListener() {
            @Override
            public void onClick(View v) {
            openDialog();
            }
        });

    }
    public void openDialog(){
    dialogBuild.show(getSupportFragmentManager(),"Dialog");
    }
}
Activity_main.xml
- LinearLayout is the main container that holds all the views.
- Linear Layout aligns all children in one direction.
- The orientation tag sets the orientation of the view vertical or horizontal.
- Here, Button is our button view which will display the button on the activity.
- layout_gravity tag sets the position of the view in the parent view.
- gravity tag used to set the position of the child view.
- id tag gives the view a unique id.
- text tag will set the text of the button.
- ListView will display a list inside the parent activity.
<?xml version="1.0" encoding="utf-8"?>
<LinearLayout xmlns:android="http://schemas.android.com/apk/res/android"
    xmlns:app="http://schemas.android.com/apk/res-auto"
    xmlns:tools="http://schemas.android.com/tools"
    android:layout_width="match_parent"
    android:layout_height="match_parent"
    tools:context=".MainActivity"
    android:orientation="vertical"
    >
    <Button
        android:layout_gravity="center"
        android:gravity="center"
        android:id="@+id/btnAlert"
        android:layout_width="wrap_content"
        android:layout_height="wrap_content"
        android:ems="10"
        android:text="Add data"/>
    <ListView
        android:layout_width="match_parent"
        android:layout_height="match_parent"
        android:id="@+id/listView"
        />
</LinearLayout>
Step 2:Create new class
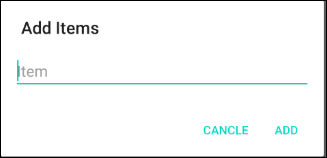
Create a new class DialogBuild.java, Here, we will create a custom Dialog box.

- Extend DialogBuild.java class with AppCompactDialogFragment
- Override method onCreateDialog
- AlertDialog.Builder will create a builder with which we can build an Alert Dialog
- With the help of Builder, we can set title, message, and many other things
- LayoutInflater shows an XML file inside another view
- In inflater, we are passing the address of XML file “dialog_layout”
- setView will assign the custom view to the builder
- setNegativeButton method is used for creating the cancel button
- DialogInterface.OnClickListener method will execute when the cancel button is pressed.
- On the positive Button, we get the item name from edit text and then we pass it to the Array List by list.add method.
- we create a new adapter object with the reference of array adapter from MainActivity.java by a getter method
- notifyDataSetChange will notify our adapter that new data has been added to the list.
DialogBuild.java
package com.example.alertdialog;
import android.app.AlertDialog;
import android.app.Dialog;
import android.content.DialogInterface;
import android.os.Bundle;
import android.view.LayoutInflater;
import android.view.View;
import android.widget.ArrayAdapter;
import android.widget.EditText;
import androidx.annotation.NonNull;
import androidx.annotation.Nullable;
import androidx.appcompat.app.AppCompatDialogFragment;

import java.util.ArrayList;


public class DialogBuild extends AppCompatDialogFragment {
    private EditText editName;

    public ArrayList<String> getList() {
        return list;
    }

    private ArrayList<String> list = new ArrayList<>();
    @NonNull
    @Override
    public Dialog onCreateDialog(@Nullable Bundle savedInstanceState) {
        AlertDialog.Builder builder = new AlertDialog.Builder(getActivity());
        LayoutInflater inflater = getActivity().getLayoutInflater();
        View view = inflater.inflate(R.layout.dialog_layout,null);

        editName =view.findViewById(R.id.editItem);
        builder.setView(view).setTitle("Add Items").setNegativeButton("Cancle", new DialogInterface.OnClickListener() {
            @Override
            public void onClick(DialogInterface dialog, int which) {

            }
        }).setPositiveButton("Add", new DialogInterface.OnClickListener() {
            @Override
            public void onClick(DialogInterface dialog, int which) {
            String name =editName.getText().toString();
                list.add(name);
                MainActivity mainActivity = new MainActivity();
                ArrayAdapter<String>  stringArrayAdapter= mainActivity.getArrayAdapter();
                stringArrayAdapter.notifyDataSetChanged();
            }
        });

        return builder.create();
    }

}
dialog_layout.xml
- Here our parent view is the relative layout.
- padding tag is used padding to view to all sides.
- EditText is our Editable Text view.
<?xml version="1.0" encoding="utf-8"?>
<RelativeLayout
    xmlns:android="http://schemas.android.com/apk/res/android" android:layout_width="match_parent"
    android:layout_height="match_parent"
    android:padding="15dp">
    <EditText
        android:layout_width="match_parent"
        android:layout_height="wrap_content"
        android:id="@+id/editItem"
        android:hint="Item"/>

</RelativeLayout>
In this way, we have learned how to create an alert Dialog to add items to ListView and Display it to the home Activity.
Android practice tasks
https://codebun.com/login-and-registration-in-android-and-sqlite/
https://codebun.com/login-and-registration-in-android-using-firebase/
https://codebun.com/dynamic-and-static-dropdown-menuspinner-in-android/
https://codebun.com/crud-operation-using-sqlite-in-android/
https://codebun.com/crud-operation-in-android-using-firebase-database/
https://codebun.com/how-to-get-data-from-api-in-android/
https://codebun.com/how-to-create-custom-alert-dialog-in-android/
https://codebun.com/search-and-sort-records-in-android-with-recycler-view/
https://codebun.com/create-a-custom-notification-with-custom-message-in-android/
